Integrate with LoadRunner Cloud
This topic describes how to integrate LoadRunner Enterprise with LoadRunner Cloud and run performance tests on the cloud.
Note: This feature is provided as a tech preview version.
About integrating with LoadRunner Cloud
Integrating with LoadRunner Cloud enables you to boost your testing capabilities by running LoadRunner Enterprise performance tests on the cloud with LoadRunner Cloud.
Running tests on the cloud is especially useful for monitoring the health of a system on days with higher demand (like Black Friday), and for detecting and diagnosing performance related problems without adding significant overhead to resource consumption. This enables you to run tests for special events without having to purchase additional LoadRunner Enterprise licenses or if you have insufficient hosts available.
For details on creating and running tests with LoadRunner Cloud, see the LoadRunner Cloud Help Center.

LoadRunner Cloud integration - workflow
This section shows the steps required to run performance tests on the cloud from LoadRunner Enterprise.
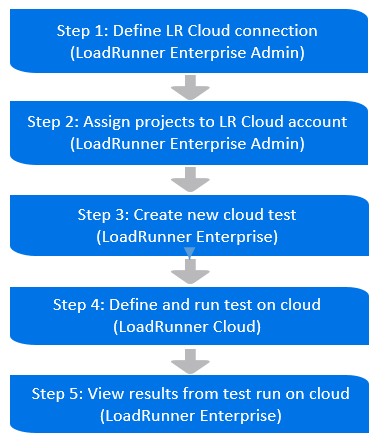
Step 1: Define LoadRunner Cloud connection information
This step explains how to define a connection to the LoadRunner Cloud account.
-
Prerequisites
To integrate LoadRunner Enterprise with LoadRunner Cloud, you need a tenant in LoadRunner Cloud with a valid license, administrator privileges, and an Internet connection.
-
In LoadRunner Enterprise Administration, select Configuration > Servers, and click the LoadRunner Cloud tab.
-
Provide the following details:
UI Element Description Tenant ID Your LoadRunner Cloud tenant ID. URL URL of the LoadRunner Cloud account. User Name Your user name in LoadRunner Cloud(must be an administrator). Password Your password in LoadRunner Cloud. Use Proxy Select to use a proxy server. When selected, specify the proxy URL, and a user name and password for the proxy server if your proxy requires authentication.
Check Connection Checks the connection to the LoadRunner Cloud account. -
Click Save to save your account connection settings.
Step 2: Assign projects to the LoadRunner Cloud account
This step explains how to assign projects to the LoadRunner Cloud account.
-
In the Assign Projects to LoadRunner Cloud Account section, click
 Assign Projects. The Projects list is displayed.
 -
Select a domain to filter the list by domain.
-
Select the projects you want to assign from the Projects list, and click Assign.
-
Assign projects to the LoadRunner Cloud account
-
Click Save.
Details of the assigned projects are displayed in the Assign projects to LoadRunner Cloud account list, and the corresponding projects are created in the LoadRunner Cloud tenant.
UI Element Description 
Refresh. Refreshes the list of projects assigned to the LoadRunner Cloud account. Project Name Displays the name of the LoadRunner Enterpriseproject assigned to the LoadRunner Cloud account. LRC Project Name Displays the name of the project in LoadRunner Cloud.
LRC Project ID Displays the LoadRunner Cloud project ID.
Cloud VU  Indicates whether the tenant has a fixed Vuser (VU) license enabling them to run any Vuser type. For details, see the LoadRunner Cloud Help Center.
Cloud VUH Indicates whether the tenant has a Vuser hours
(VUH) license enabling them to run Vusers by the hour in load tests on the cloud. For details, see the LoadRunner Cloud Help Center.
Step 3: Create a new cloud test
This step explains how to create a cloud test from LoadRunner Enterprise.
-
Log onto LoadRunner Enterprise and select a project that has been assigned to the LoadRunner Cloud account (see above).
-
From the LoadRunner Enterprise navigation toolbar, click
 and select Create New Cloud Test. LoadRunner Cloud opens in a new tab.
Step 4: Define and run the test
This step explains how to define and run a test from LoadRunner Cloud.
-
On LoadRunner Cloud menu bar, click your user name and select Project management > Projects.
-
Select the name of the LoadRunner Enterprise assigned to the LoadRunner Cloud account.
-
Define and run the performance test. For details, see the LoadRunner Cloud Help Center.
Step 5: View results from tests run on the cloud
You can view and analyze LoadRunner Cloud tests and runs in real time from the LoadRunner Enterprise Dashboard, or after a run has finished from graphs or a consolidated report.
For details, see View the dashboard.
Notes and limitations
-
You cannot schedule to tests to be run on the cloud from LoadRunner Enterprise.
-
When a project that is assigned to a LoadRunner Cloud account is deleted from the server, the project is still displayed in the Assign projects to LoadRunner Cloud account grid, but the name of the project is empty.