Share this page


Manage tenants in Site Management
When logging into LoadRunner Enterprise as a Site Management user, you have access to the Site Management console where you can define and manage all shared spaces (tenants).
Tip: See the LoadRunner Enterprise video gallery for a video on tenant administration.
Log on to Site Management
This task describes how to launch Site Management on your machine from your Web browser.
-
Open your Web browser (Chrome, Edge, Firefox and Safari are supported) and enter the Site Management URL in the following format:
http://<LoadRunner_Enterprise_Server_name>/SiteThe Site Management Login window opens.
-
In the User Name box, enter your user name. Only a Site Management user can log on to Site Management (the Site Management console is not visible to users with admin or user roles).
The first time you log in to Site Management, you must use the user that you specified during the LoadRunner Enterprise installation. After you log in to Site Management, you can define additional Site Management users. For details, see Create and manage Site Management users.
-
In the Password box, enter the Site Management user's password.
-
Select the language for displaying the Site Management user interface.
The multilingual user interface, or MLU, provides support for multiple languages on a single instance of LoadRunner Enterprise without having to install language packs. Supported languages are English, French, German, Japanese, Simplified Chinese, and Korean.
-
Click the Login button. Site Management opens to the Tenants page. For details, see Manage tenants below.
Tip: To avoid having the same user name and password in LoadRunner Enterprise and the Site Management console, we recommend creating a new Site Management user and deleting the default configuration user from Site Management.

Manage tenants
In Site Management > Tenants, Site Management users can create and manage tenants. The tenant details, status (active or inactive), and the administrator for each tenant are displayed in the Tenant Details tab.
A default tenant is created automatically, and the default Site Management user (the user defined during installation) is assigned as the administrator for this tenant.
As a Site Management user, use this page to:
| Action | Description |
|---|---|
| Create new tenants |
|
| Connect to a tenant |
Click the Connect link in the grid to connect directly to a tenant. Alternatively, you can copy the tenant's login URL from the Tenants grid (Copy URL Note: You can only connect to a tenant that has an Active status. |
| Rename tenants | To edit a tenant name, click the tenant name link in the grid, and rename the tenant in the Tenant Details page. |
| Remove and restore tenants |
Removes a LoadRunner Enterprise tenant from the Tenants grid (its details are deleted from the server). This does not delete the tenant database schemas and file repository from the database and you can restore the tenant if necessary. For details, see Remove and restore tenants. |
| Upgrade tenants |
You can upgrade tenants to a later version of LoadRunner Enterprise. The Tenant State and Version are updated to reflect the upgrade state and the new version. For details, see Upgrade tenants. Note: Only a single tenant that is in |
| Activate or deactivate tenants |
You can deactivate a tenant by selecting it and clicking Deactivate or by changing its status to Inactive in the Tenant Details page. This enables you to block access to a tenant. When you deactivate a tenant, the tenant data is kept. If needed, you can reactivate a tenant by clicking Activate or by changing its status to Active. Note:
|
 ) or the Tenant Details page to a browser, and bookmark the link.
Create and manage Site Management users
You can create additional Site Management users and perform the following tasks from Site Management > Users:
| Add new Site Management users |
Click Add User Note: When you create Site Management users, you need to add them to LoadRunner Enterprise Administration as Site Admin users before they can log onto LoadRunner Enterprise Administration and configure lab resources for the tenant. For details, see Define a Site Admin user. |
| Activate or deactivate Site Management users |
You can deactivate a Site Management user by selecting it and clicking Deactivate or by changing its status to Inactive in the User Details page. This enables you to block access to a Site Management user. When you deactivate a Site Management user, the user's data is kept. If needed, you can reactivate a Site Management user by clicking Activate or by changing its status to Active. Note: There must be at least one active Site Management user at all times. |
| Reset password |
In the grid, click the user name link of a Site Management user whose password you want to reset to open the User Details page. Enter a new password for the Site Management user. |
| Remove Site Management users |
In the grid, select a Site Management user and click Delete User Note: You can only delete the default LRE Admin user from Site Management after another Site Management user has been created. |
| Export Site Management user details to Excel | Click Export to XLS  to export Site Management user details to an Excel file. The Excel file is downloaded to the Downloads folder of the client user. to export Site Management user details to an Excel file. The Excel file is downloaded to the Downloads folder of the client user. |
 .
.For more on Site Management users, see User roles.
Check the tenant server
A Site Management user can perform the following checks on the tenant server from Site Management > Servers:
| Action | Description |
|---|---|
| Run the server check |
Click Check Server |
| Update server details | Click the name link of the LoadRunner Enterprise tenant server in the grid to open the Server Details page. You can update the internal and external URLs and deactivate and activate the server state. |
| View each server check step |
To view the status of each step of the server checks, click the name link of the LoadRunner Enterprise tenant server in the grid, and select Check Server Status. This includes the category and sub-areas in which the feature checks the server, the expected and actual results, status, and errors (if an error occurred during the check). |
| Change the server state |
You can change the state of the server by selecting it and clicking Non-Operational in the Server Details page. This enables you to block access to a server. You can make the server available by changing its state to Operational. |
| Delete the tenant server |
In the grid, select a Site Management user and click Delete Server |
 to run the server checks. This displays the current state of the server, and whether the last performance, connectivity, configuration, and installation check passed or failed.
Check tenant log files
You can view events associated with tenants directly from the Site Management console by selecting Site Management > Logs.
You can perform the following actions from the Logs grid:
| Action | Description |
|---|---|
| View log details |
To view a log, select a log type (W3WP or LRE Core API) and the specific file to display. Each row in the log displays an event with its severity level (Error, Warning, Debug, and Info), date and time that the event occurred, and the text message that was generated during the event. Events are listed in chronological order with the most recent one being listed at the top. You can drill down on each event to see the following:
Click Columns |
| Display other log files |
You can display log files not located in the default log directory (provided they have the same format), by clicking Browse File When a log from a different directory is displayed, the default log selection fields at the top of the grid are unavailable. To clear the grid and enable the default log selection fields, click Clear. |
| Filter |
To filter the information being displayed in the grid, click |
| Export log files |
To export information displayed in the Logs page to an Excel file, click Export to XLS |
| Download log file |
To download a log file, click Download Selected File |
 to display additional log information (Process, Thread, Logger, and Context).
  and selecting a file, or by dragging and dropping the file on the grid.
  and define a filter condition based on values of that field. For details, see
 Define additional Tenant Admin users
A Tenant Admin user is responsible for configuring its respective tenants in LoadRunner Enterprise Administration.
After the sSite Management user has created the initial Tenant Admin user in Site Management, the Site Management user or initial Tenant Admin user can define additional admin users in LoadRunner Enterprise Administration who can then log into their respective tenants and start configuring them.
Note:
-
A Tenant Admin user has restricted access in LoadRunner Enterprise Administration. For details, see Predefined admin roles.
-
Only a Site Admin or a Tenant Admin user in LoadRunner Enterprise Administration can define other users as Tenant Admin users. For details on the different user types, see Predefined admin roles.
To define additional Tenant Admin users:
-
Log onto LoadRunner Enterprise Administration. For details, see Log on to LoadRunner Enterprise Administration.
-
In LoadRunner Enterprise Administration, select Management > Users, and click Add User
 on the Users toolbar.
 -
Enter the user details in the Create User page. For details, see Create or edit a user.
-
If you logged onto LoadRunner Enterprise Administration as the LRE Admin user, select the Admin User check box, and choose Tenant Admin.
-
If you logged onto LoadRunner Enterprise Administration as a Tenant Admin user, select Tenant Admin.
-
-
To assign projects and roles to a user, see Assign projects and roles to a user.
-
Click Save to add the new user to the Users grid.
Change the initial Site Admin password
You can change the password of the initial Site Admin user created during LoadRunner Enterprise installation or configuration from the Users tab in Site Management. The new password is automatically synchronized across all locations where it is stored to prevent password mismatch.
For details, see Change the initial Site Admin user password.
View tenant repository usage
The Tenant Usage Reports enable you to keep track of file storage usage for each tenant.
-
In Site Management, select the Tenants tab.
- Select a tenant in the grid (click the link in the Tenant Name column). The tenant details page opens in the Tenant Edit view.
-
Select the Tenant Usage Reports view.
The view displays the following information about file usage for the selected tenant:
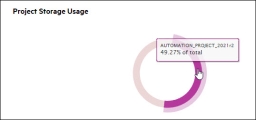
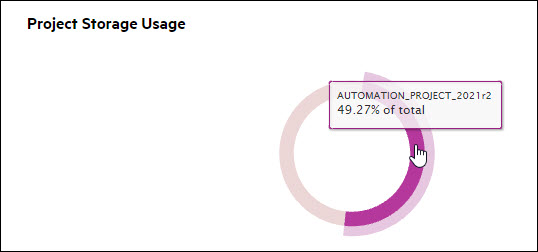
Project Storage Usage. The pie chart shows the percentage of the total file repository that each project in the tenant uses.
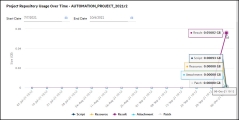
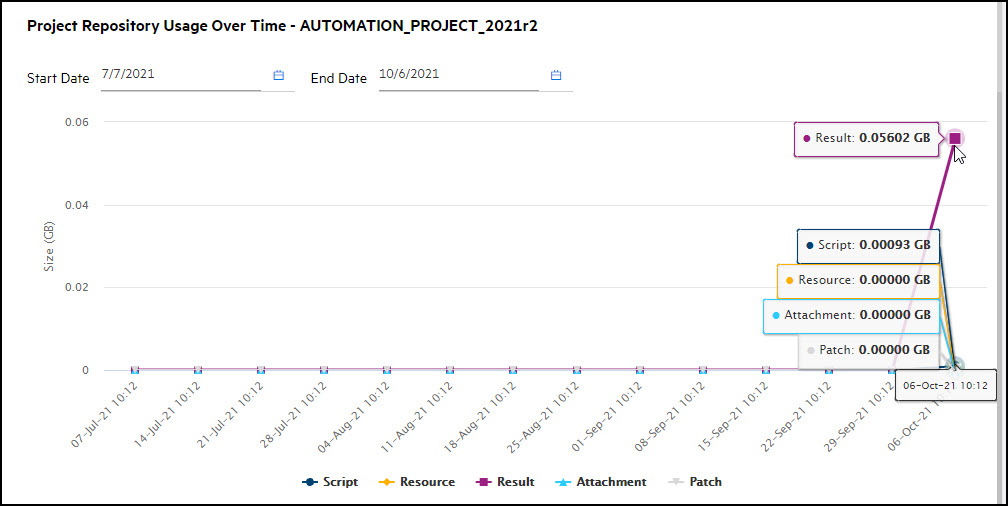
Project Repository Usage Over Time. The graph shows the progression of file repository usage (scripts, attachments, results, and resources) over time for all projects in the tenant. You can filter the graph by selecting a start and end date.
Perform actions from the entity details menu
You can perform various actions on an entity in Site Management using the menu in the entity's details page. To open the menu, click the vertical ellipsis  in the upper-right corner of the entity's details page.
You can perform the following actions from the menu:
| Module | Action |
|---|---|
| Hosts |
|
| Servers |
Delete Server. Deletes the selected server. For details, see Check the tenant server. |
| Users |
Delete User. Deletes the selected user. For details, see Create and manage Site Management users. |
| Cloud Accounts |
Delete Cloud Account. Deletes the selected cloud account. For details, see Delete a cloud account. |
| Tenants | Remove Tenant. Removes the selected tenant. For details, see Remove a tenant. |
 See also: