
Share this page


Set up a team
This topic provides instructions on how to create a team and manage team capacity.
Before creating a team
To create a team, you must have both the Create Resource Pool access grant and the Edit Resource Pools or Edit All Resource Pools access grant.
You can create a team from a resource pool or from scratch. Creating a team from scratch automatically creates a resource pool with the same name. After you create a team, you can go to its associated resource pool page from the edit team properties dialog.
Once you create a team, you cannot delete it. You can only deactivate it from the associated resource pool page. For details, see Deactivate a resource pool.
By default, disabled teams are not listed in the My Teams or All Teams page. Select the Show Disabled Teams check box to display the disabled teams.

Create a team
You can create a team from a resource pool or from scratch.
Create a team from a resource pool
If you already have resources managed in a resource pool and you want to group them in a team, you can create a team from the resource pool.
To create a team from a resource pool, click the Create a team for the resource pool link in the resource pool page.

When a team is created for the resource pool:
- The resources in the resource pool are copied to the team.
- The resource pool attributes including name, region, status, manager, and org unit are applied to the team.
- If the resource pool has children, teams are automatically created for the children and nested under the team as subteams.
To create a team from scratch:
-
From the PPM menu, select Open > Team Management. The Team Management page opens in the All Teams tab.
-
Click Add.
-
Specify the team properties as follows.
Field Description Name Required.
Give the team a name.
Managers Optional.
Select the team managers. You, as the team creator is the default manager.
Region Required.
Select a region for the team.
Team Type It can serve as a cost factor in team cost rules to calculate team related costs.
If the out-of-the-box team type values are not applicable to your team, customize the validation "Team-Team Type" to define team types to your needs.
Team Specialty What your team is professional at.
It can serve as a cost factor in team cost rules to calculate team related costs.
If the out-of-the-box team specialty values are not applicable, customize the validation "Team-Team Specialty" to define team specialties to your needs.
Organization Unit The organization unit where your team belongs.
This field is optional by default, but the administrator can make this field required by setting the ENFORCE_ORG_UNIT_FOR_RESOURCE_POOL_AND_TEAM parameter to true. For details, see Server parameters.
Parent Optional.
- If you want to create an independent team, leave the Parent field empty.
-
If you want to create a child team of an existing team, select a parent team for your new team.
You can also create a child team by clicking Add > Team in the parent team page.
Description Optional. Type a description for the team. -
Click Create.
Your new team appears in both the All Teams and My Teams tabs.
Manage team capacity
This section provides details of how to manage team capacity.
Your changes to the team resources simultaneously take effect on the team related resource pool.
Add a resource
To add a resource to a team:
Prerequisite: You must be the resource pool manager.
If the Enable Users with Edit Access to Manage Resources Within Resource Pools/Teams feature toggle is enabled, you have the edit access to the resource pool.
-
Open the team's Members tab in the Hierarchy view.
-
Click Add > Resource.
-
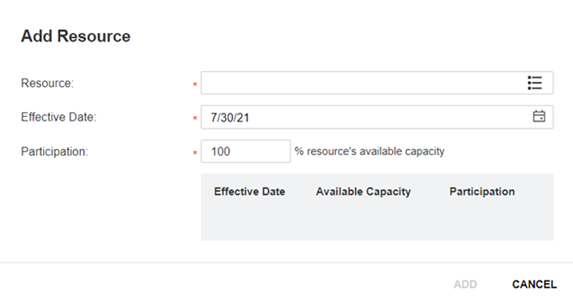
Fill the fields in the Add Resource dialog box.
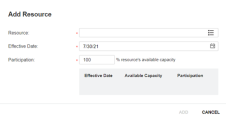
Field Description Resource Select the resource to add to the team.
Only the resources that you can edit are available for selection.
Effective Date The date when the resource begins to participate in the team. Participation The distribution of the resource's available time in the team.
-
Click Add.
The resource is listed under the team. The specified resource participation is added to the team capacity starting from the start date.
Add an unnamed headcount
To add an unnamed headcount to a team:
-
Prerequisites:
-
You have the Edit All Resource Pools access grant, or
-
You have the Edit Resource Pools access grant, and are given the Edit Unnamed Headcount access on the Configure Access page for the team's associated resource pool.
-
-
Open the team's Members tab in the Hierarchy view.
-
Click Add > Unnamed Headcount.
-
Specify the following properties for the unnamed headcount:
Property Description Role Role of the unnamed headcount. Label Identifier of the unnamed headcount. It will appear in the Name column in the Members tab. Start Date The date when the unnamed headcount starts in the team. Comments Additional information about the unnamed headcount -
Click Add.
The unnamed headcount is listed under the team.
-
Edit the capacity of the unnamed headcount. Double-click the target time period cell and enter a new number.
You can use the shortcuts described in Shortcuts when editing allocation to facilitate the edit.
Add a sub-team
To ad a sub-team to a team:
-
Open the team's Members tab in the Hierarchy view.
-
Click Add > Team.
-
Do the following:
-
To create a new team and add it to the current team as a sub-team, specify team properties in the Add New Team dialog box and click Create.
For details about team properties, see Team properties.
-
To add an existing team:
-
In the Add New Team dialog box, click the Add a team link.
-
In the Add Existing Team dialog box, select the target team and click Add.
-
-
Transfer a resource or sub-team to another team
You can only transfer a resource or sub-team that directly belongs to the current team.
To transfer a resource or sub-team to another team:
-
Open the team's Members tab in the Hierarchy view.
-
Select the resource or sub-team to transfer and click the
 button.
 -
If you want to transfer a resource, fill the following fields in the Transfer Resource dialog box and click OK.
Field Description Effective Date The date when the resource is transferred. Transfer to Team The team to which the resource is transferred.
You can only transfer a resource to a team that you can edit.
Transferred Participation The amount of participation to be transferred. Transfer Option Enabled only when you transfer all participation of a resource to another team.
Specify the transfer option of the resource's assignment.
- Unchanged. After the resource is transferred, the resource assignment in the current team stays unchanged starting from the effective date.
- Removed. After the resource is transferred, the resource assignment in the current team is cleared starting from the effective date.
- Transferred. After the resource is transferred, the resource assignment in the current team is transferred to the target team starting from the effective date.
You can use the RESOURCE_ASSIGNMENT_TRANSFER_OPTION parameter to specify the default transfer option. For details, see Server parameters.
Starting from the effective date, the team capacity is reduced by the transferred resource participation. If you transfer all participation of a resource to another team, the resource disappears from the team.
-
If you want to transfer a team, in the Transfer Team dialog box, specify the parent team to which the sub-team is transferred and click OK.
You can only transfer a sub-team to a team that you can edit.
Remove a resource, unnamed headcount, or sub-team
You can only remove a resource, unnamed headcount, or sub-team that directly belongs to the current team.
To remove a resource, unnamed headcount, or sub-team:
-
Open the team's Members tab in the Hierarchy view.
-
Select the resource, unnamed headcount, or sub-team that you want to remove and click the
 button.
 -
To remove a resource, in the Remove Resource dialog box, specify the effective date and the amount of removed participation, and click OK.
-
If you remove all participation of a resource from the current team, in the Remove Option field, specify the remove option of the resource's assignment:
- Unchanged. After the resource is removed, the resource assignment in the current team stays unchanged starting from the effective date.
- Removed. After the resource is removed, the resource assignment in the current team is cleared starting from the effective date.
Starting from the effective date, the team capacity is reduced by the removed resource participation. If you remove all participation of a resource, the resource disappears from the team.
-
To remove an unnamed headcount or a sub-team, click Yes in the confirmation dialog box.
Edit team properties
You can update team properties anytime after team creation.
- Open the team details page.
-
Click the image next to the team name, and click the edit icon.
-
Update team properties as needed. For properties description, see Create a team from scratch.
Parent: You update where your team stands in your organization by updating its parent team.
- Save your changes.
Upload your team photo
Upload a photo for your team to help you quickly recognize your team from the team list.
- Open the team details page.
-
Click the image next to the team name, and then click the image with a camera icon on it.
- Select an image file to upload.
 See also:


