UFT One checkpoints verify that expected information is displayed in your app while the test is running.
This exercise describes how to insert various types of checkpoints, and use a function to check the validity of the objects in the MyFlight sample app.
Create a new test for checkpoints
Create a copy of your existing MyFlight test, where you can add checkpoints then see the differences in how UFT One runs your test.
To create a test:
-
Start with the MyFlightApplication solution open in UFT One.
If you've closed and opened UFT One, make sure you start it with the WPF Add-in loaded.
-
In the Solution Explorer, right-click the MyFlight test node, and select Save As.
-
Save the test in the same location (C:\Users\<username>\Documents\UFT One).
In the File name field, enter MyFlightCheckpoint, and then click Save.
The Solution Explorer switches to display MyFlightCheckpoint test instead, with all the same actions and steps as the original MyFlight test.
Tip: To display all of your tests at the same time, add the MyFlight test back to your solution.
In the Solution Explorer, right click the solution node, and select Add > Add Existing Test. Select the MyFlight test.
Add a standard checkpoint
Add a standard checkpoint to verify the value entered for the Passenger Name field in the MyFlight app Flight Details window.
To add a standard checkpoint:
-
In UFT One, open the FlightConfirmation action in the MyFlightCheckpoint test, in the
 Keyword View.
 -
Select the passengerName step row.
Do this by clicking the vertical ellipsis in the left margin's gray area, adjacent to passengerName. Clicking in the Item column will select the object only, and not the step.

-
Select the Design menu > Checkpoint > Standard Checkpoint.
-
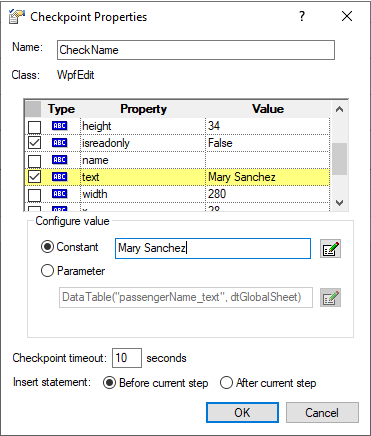
In the Checkpoint Properties dialog, enter CheckName in the Name field.
-
Scroll down in the grid, and select the row that contains the text property name.
-
Click in the Value column, and then select Constant in the Configure value area below the grid.
-
In the Constant field, enter Mary Sanchez. This is the value you entered in the Passenger Name field, in the first step of the action.
Note that the value in the grid is updated as well.
-
In the Insert statement area at the bottom of the dialog, select After current step.
Accept the other default settings, and click OK.
Back in the Keyword View, the checkpoint step is added after the passengerName Set step.
Tip: To learn more about the checkpoint properties, right-click on the checkpoint step and select Checkpoint Properties to open the dialog again.
Then click the
 help button in the top-right corner of the dialog to open the relevant Help Center page with more details.
 - Save your test, and continue with Add a table checkpoint.
Add a table checkpoint
Add a table checkpoint to verify a price value in the flights grid on the MyFlights sample app Select Flight page.
To add a table checkpoint:
-
Open the MyFlight app to the SELECT FLIGHT page. If the MyFlight GUI app is already open, click NEW SEARCH to start again.
Search for a flight using the same data you used in the FlightFinder action. This will ensure that the price you are checking for matches the value that the test searches for.
For more details, see Flight GUI layer.
-
In UFT One, open the SelectFlight action in the MyFlightCheckpoint test, in the
 Keyword View.
 -
Select the flightsDataGrid step, which selects the specific flight to book.
-
Configure UFT One to record on the open page in the MyFlight app.
Select Record > Record and Run Settings. In the Windows Applications tab, select the Record and run test on any open Windows-based application option, and click OK.
-
Click Record
 . The main UFT One window is hidden as your recording session begins.
 -
In the record toolbar, click the Insert Checkpoint or Output Value drop-down arrow
 , and select Standard Checkpoint. The mouse pointer turns into a pointing hand.
 -
In the MyFlights app, click the flights table.
The Standard Checkpoint dialog appears, with the WpfTable : flightsDataGrid object selected.
-
Click OK to continue.
In the Define Row Range dialog that appears, ensure that the All rows option is selected, and click OK.
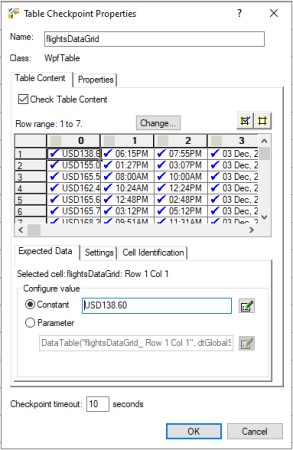
The Table Checkpoint Properties dialog appears, showing a table with cells that represent the MyFlights table.
For example:
By default, all cells are selected, which means that all cells would be checked.
-
Enter CheckCost in the Name field at the top to name your checkpoint.
Then double-click each column header in the grid to clear all selections. Scroll to the right to ensure you cleared all columns.
-
Scroll back to the first column, and double-click the cell in row 1, column 0 to select only the first cell in the top-left. For example:
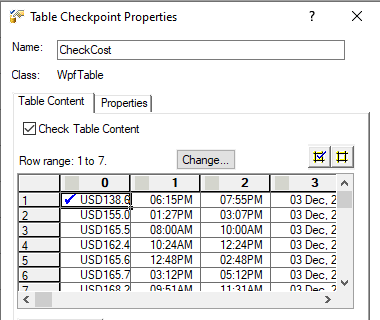
The value in this cell should match the value on SELECT FLIGHTS page using the values in the FlightFinder action.
-
Accept the other default settings, and click OK.
-
In the recording toolbar, click Stop
 .
. Back in the Keyword View, the checkpoint step is added after the flightsDataGrid SelectCell step.
In the Editor, the test looks like this:
Copy codeWpfWindow("OpenText MyFlight Sample").WpfTable("flightsDataGrid").SelectCell "0", "2"
WpfWindow("OpenText MyFlight Sample").WpfTable("flightsDataGrid").Check CheckPoint("CheckCost")
WpfWindow("OpenText MyFlight Sample").WpfButton("SELECT FLIGHT").Click -
Save your test, and continue with Add a text checkpoint.
Add a text checkpoint
Add a text checkpoint to your test to check whether the order is completed on the MyFlights sample app Order Details page.
To add a text checkpoint:
-
Open the MyFlight app to the ORDER DETAILS page.
-
In UFT One, open the FlightConfirmation action in the MyFlightCheckpoint test, in the
 Keyword View.
 -
Select the ORDER step row.
-
Configure UFT One to record on the open page in the MyFlight app.
Select Record > Record and Run Settings. In the Windows Applications tab, select the Record and run test on any open Windows-based application option, and click OK.
-
Click Record
 . The main UFT One window is hidden as your recording session begins.
 -
Create the checkpoint and configure it to check for the text "completed".
-
In the Record toolbar, click the Insert Checkpoint or Output Value button
 and select Text Checkpoint. The mouse pointer changes into a pointing hand.
 -
In the Order Details window in the flight reservation application, click the Order # Completed graphic in the middle of the window:

Note: The order number may differ depending on if you have previously run the flight reservation application.
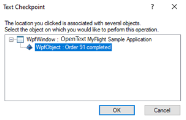
The Text Checkpoint object selection dialog box opens:
-
In the Text Checkpoint object selection dialog box, select the WpfObject object and click OK. The Text Checkpoint Properties dialog box opens:
-
In the Name box in the Text Checkpoint Properties dialog box, enter CheckOrderCompletedText as the new checkpoint name.
-
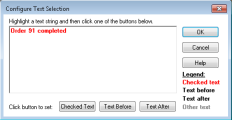
Under the Checkpoint Summary area, click the Configure button. The Configure Text Selection dialog box opens:
-
In the Configure Text Selection dialog box, highlight the string completed and click Checked Text. The Order # text string changes from red to gray:
-
Click OK to close the Configure Text Selection dialog box.
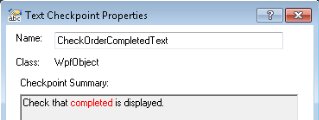
In the Text Checkpoint Properties dialog box, the Checkpoint Summary Area is updated to reflect your selection:
-
Accept the rest of the settings as the default and click OK.
-
-
On the Record Toolbar, click Stop
 to stop recording.
UFT One adds the step with the text checkpoint to your test, below the step containing the ORDER object. It is displayed in the Keyword View as a checkpoint operation on the Order # Completed object:
In the Editor, the statement looks like this:
Copy codeWpfWindow("OpenText MyFlight Sample").WpfObject("Order 91 completed").Check CheckPoint("CheckOrderCompletedText") - Save your test, and continue with Run your checkpoint test.
Run your checkpoint test
Run your checkpoint test to see how the checkpoints perform. If the checkpoints pass, this means they found the data they were configured to find, and the test passes.
If one or more of the checkpoints had failed, the test run is listed as Failed.
To run the checkpoint test:
- If the MyFlights sample app is opened, close it.
-
In UFT One, select Record > Record and Run Settings.
-
In the Windows Applications tab, select the Record and run only on: option, and ensure that the following options are selected:
- Applications opened by UFT One
- Applications specified below
The Flight GUI application details are still there from when you defined them earlier. For more details, see Run and analyze your GUI test.
-
Click OK , and then click Run
 .
. -
In the Run dialog, ensure that the MyFlightCheckpoint test is selected in the Test Name dropdown.
On the Results Location tab, ensure that the New run results folder option is selected.
Accept the other default values.
-
Click Run to run the test. In the run results, scroll down in the test flow to the following steps:
- SelectFlight action > Table Checkpoint: flightDataGrid
- FlightConfirmation action > Standard Checkpoint: passengerName
- FlightConfirmation action > TextCheckpoint: Order <#> completed
Click each checkpoint step to view details about the data found during the test run.
Continue the tutorial with Test a GUI application with output values.
Parameterize passenger name
Parameterize the passenger name to use different names from a data table.
Note: This exercise is recommended for advanced users.
In the FlightConfirmation action:
- In Keyword view, select passengerName.Set.
- Select Tools > Data Driver.
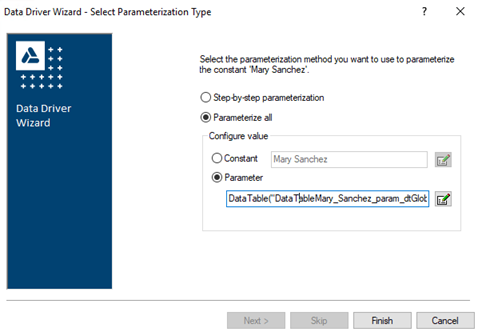
- In the Data Driver dialog box, select Mary Sanchez and click Parameterize.
-
In the Data Driver wizard, select Parameterize all and Parameter.
-
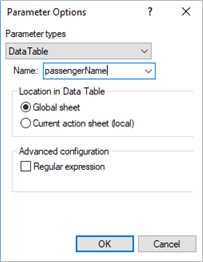
Click the Edit button
 and type passengerName in the Name field. Click OK.
-
In the Data Driver wizard, click Finish. Then click OK. View the code.

-
In the Data > Global sheet, enter several passenger names.
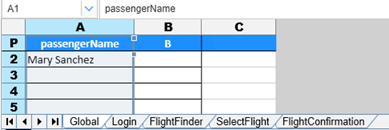
- Run the test.
Parameterize a checkpoint
Parameterize the checkpoint to use different values from a data table.
Note: This exercise is recommended for advanced users.
In the FlightConfirmation action:
- In Edit view, right click the CheckOrderCompletedText checkpoint, and select Checkpoint Properties.
- Select Parameter and click the Edit button
 .
. -
In the Parameter Options dialog box, enter CheckOrderCompletedTextChecked_Text in the name field, and click OK.

-
In the Data > Global sheet, enter several checkpoint names.

- Run the test.
Manage checkpoints in the object repository
View checkpoints in the object repository to view and properties from there, especially when a checkpoint is reused in multiple places in your test.
Example: For example, you may want to create a checkpoint to verify that your company logo appears on each page in your app.
Create the checkpoint, and insert it in different actions in your test. Access it easily from the object repository instead of having to browse to its location each time you want to change it.
This tutorial does not include reusing checkpoints.
To view checkpoints in the object repository:
- Start with the MyFlightCheckpoint test and the FlightConfirmation action open in UFT One.
- In the toolbar, click the Object Repository button
 .
. - Scroll down to the bottom to view the checkpoints you added in this exercise.
- Select a checkpoint to view or update its properties on the right.
 Next steps:


