Share this page


Creating a New Project
In this section you create a new project for the ImageControls toolkit support. To do this, you use one of the wizards provided by the Java Add-in Extensibility plug-in in Eclipse.
Create a Java Add-in Extensibility project
Open the New UFT Java Add-in Extensibility Project wizard.
In Eclipse, select File > New > Project. The New Project dialog box opens. Expand the Unified Functional Testing folder and select UFT Java Add-in Extensibility Project.
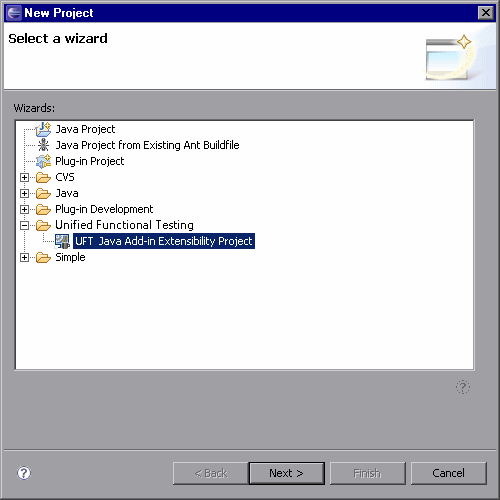
Click Next. The UFT Java Add-in Extensibility Project screen opens. The details on this screen may vary, depending on the version of Eclipse that you are using.
Enter the UFT Java Add-in Extensibility Project details.
In the Project name box, enter
ImageControlsSupport. Select Create separate folders for sources and class files. (In earlier Eclipse versions this option is named Create separate source and output folders.) For more information on this dialog box, see the Eclipse Help.
Click Next. The Custom Toolkit Details screen opens.
Enter the custom toolkit details.
In this screen, you provide the details of the ImageControls toolkit so that the wizard can generate a corresponding custom toolkit support set.
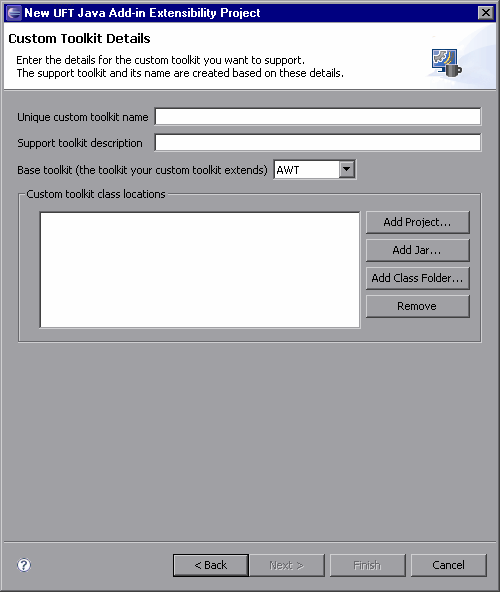
Define the following information:
In the Unique custom toolkit name box, you enter a name that uniquely represents the custom toolkit for which you are creating support. The new toolkit support class is given this name plus the suffix-word
Support. Providing unique toolkit names allows a single OpenText Functional Testing installation to support multiple custom toolkit support sets simultaneously.After you develop the support and deploy it to OpenText Functional Testing, the custom toolkit name is displayed in all of the dialog boxes that display lists of add-ins or supported environments.
Enter the name
ImageControls.In the Support toolkit description box enter:
ImageControls toolkit support.The Base toolkit list contains a list of toolkits for which OpenText Functional Testing support already exists. After you create support for your own toolkits, they are displayed in the list as well.
The ImageButton custom class extends an AWT component, so keep the default selection AWT as the Base toolkit.
You must specify the location of the custom classes you want to support in this toolkit. When the new project is built, these classes are added to the project build path. You can specify .jar files or file system folders for the class location.
In the Custom toolkit class locations area, click Add project to select the Eclipse Java project containing the custom classes for the ImageControls toolkit. The Select Project dialog box opens and displays the projects in the current Eclipse workspace.
Select the ImageControls check box. Click OK. The ImageControls project is added in the Custom toolkit class locations box.
Click Finish. The Project Summary screen opens.
View the Project Summary wizard screen.
Review the details of the project and click OK.
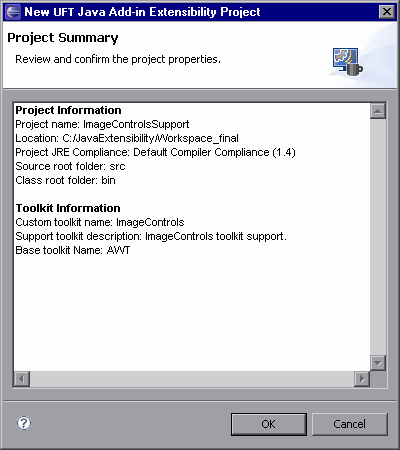
The wizard creates a new Java Add-in Extensibility project named ImageControlsSupport, containing the basic files required for custom toolkit support.

Understanding Your New Custom Toolkit Support Set
Your new Java Add-in Extensibility project is displayed in the Package Explorer tab.
Note: If you have more than one JRE installed on your computer, make sure that the ImageControls project and the ImageControlsSupport project are using the same JRE version. If they are not, modify the JRE for one of the projects so that they use the same version.
Expand the ImageControlsSupport project to view its content.

The src folder contains the following packages:
com.mercury.ftjadin.qtsupport.imagecontrols
This package contains the new toolkit support class file, ImageControlsSupport.java, which defines the new toolkit support class, ImageControlsSupport:
public class ImageControlsSupport extends AwtSupport {
}
The ImageControls toolkit for which you are creating support extends AWT. Therefore, the ImageControls toolkit support class extends the built-in AwtSupport. No additional implementation is needed in this class.
com.mercury.ftjadin.qtsupport.imagecontrols.cs
This package is currently empty. When you create the individual custom control support classes, they are stored in this package.
The Configuration folder contains the following items:
The TestObjects folder.
This folder is currently empty. If you create new test object classes to represent the custom controls in your toolkit, a test object configuration file is created in this folder. This is not relevant for this lesson.
The toolkit configuration file: ImageControls.xml.
Open the file to view its content.
<Controls
    class="com.mercury.ftjadin.qtsupport.imagecontrols.ImageControlsSupport"
    SupportClasspath="C:\JavaExtensibility\Workspace_final\ImageControlsSupport\bin"
    description="ImageControls toolkit support.">
</Controls>
At this point, the XML file contains a single Controls element that declares the toolkit support class by providing values for the class, SupportClasspath, and description attributes.
When you create the individual custom control support classes, the mapping of each custom control to its support class is added to this configuration file.
Notice that the support class location is currently in your Eclipse workspace. This is appropriate for the development phase of the custom support. When the support is fully implemented and tested, you store the support classes in a more permanent location on an OpenText Functional Testing computer and update the values in the toolkit configuration file appropriately. For more information, see Deploying and Running the Custom Toolkit Support.
For a complete understanding of the structure of this file, see the Toolkit Configuration Schema Help.
 Next steps: