New Project Wizard
You use the New Project wizard to create a new project in Eclipse containing the files that comprise the support set for a specific custom toolkit. After you specify the details of the custom toolkit, the wizard creates the necessary toolkit support files.
After you create the New UFT Java Add-in Extensibility Project, you can create support for each of the custom toolkit classes. To do this, you use the New Custom Support Class Wizard (or the New Custom Static Text Support Class Wizard).
Open the New Project wizard
In Eclipse, select File > New > Project. The New Project dialog box opens.
Expand the Unified Functional Testing folder and select UFT Java Add-in Extensibility Project.
Click Next. The UFT Java Add-in Extensibility Project screen opens.
Tip: You can shorten this process by customizing Eclipse to provide UFT Java Add-in Extensibility Project as an option in the New menu. To do this, perform the following: Select Window > Customize Perspective. In the Shortcuts tab in the dialog box that opens, select the Unified Functional Testing and UFT Java Add-in Extensibility Project check boxes. Click OK.
UFT Java Add-in Extensibility Project Screen
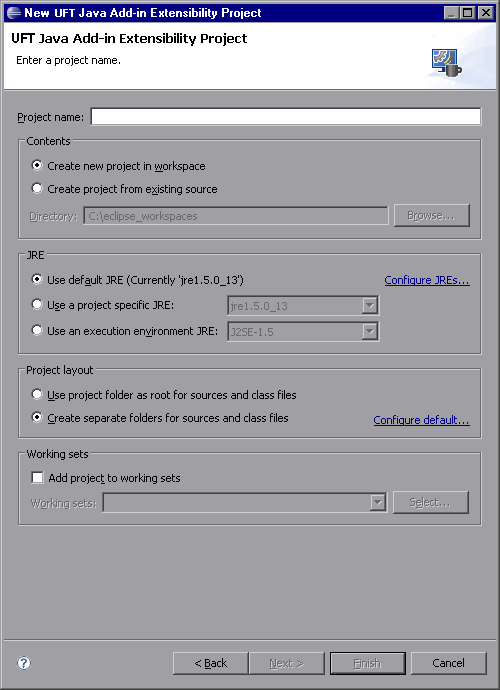
In the UFT Java Add-in Extensibility Project screen, you can create a Java Add-in Extensibility project and define the project layout. The details on this screen may vary, depending on the version of Eclipse that you are using.

Perform the following:
In the Project name box, enter a name for the project.
In the Project Layout area, select Create separate folders for sources and class files. (In earlier Eclipse versions this option is named Create separate source and output folders.)
Click Next to continue to the Custom Toolkit Details Screen.
For information on the options available in this Eclipse wizard screen, see the Eclipse Help.
Custom Toolkit Details Screen
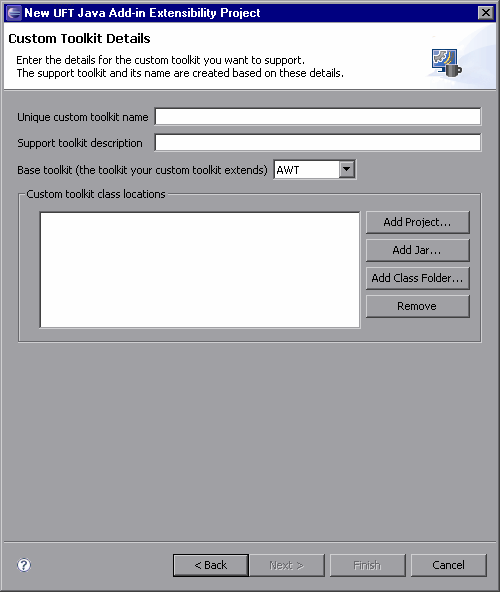
In the Custom Toolkit Details screen, you provide the details of the custom toolkit so that the wizard can generate a corresponding custom toolkit support set. When you click Finish the Project Summary screen opens.

In this wizard screen you specify the following details:
Unique custom toolkit name. A name that uniquely represents the custom toolkit for which you are creating support. OpenText Functional Testing displays this name in all of the dialog boxes that display lists of add-ins or supported environments. Providing unique toolkit names enables a single OpenText Functional Testing installation to support numerous custom toolkit support sets simultaneously.
The name must begin with an English letter and contain only alphanumeric characters and underscores.
The wizard uses this name when it creates the new toolkit support set. For example:
The toolkit support class is named
<custom toolkit name>Support.The toolkit configuration file is named
<custom toolkit name>.xml. (The custom toolkit name that is displayed in the Add-in Manager and other dialog boxes is derived from the name of this file.)If the wizard creates a test object configuration file, it enters the custom toolkit name in the PackageName attribute of the TypeInformation element. This enables OpenText Functional Testing to associate the new test object classes to the correct custom toolkit.
You cannot specify the name of a custom toolkit whose support is already deployed to OpenText Functional Testing. If you want to create a new project using the wizard, and use this project to replace existing custom toolkit support, you must first manually delete the existing support. To do this, browse to <OpenText Functional Testing installdir>\bin\java\classes\extension, delete the toolkit configuration file, and then use the Reload Support Configuration command.
Support toolkit description. A sentence describing the support toolkit. The description is stored in the toolkit configuration file.
Base toolkit. The toolkit that the custom toolkit extends. A toolkit can be considered the base toolkit of a custom toolkit if all of the custom controls in the custom toolkit extend controls in the base toolkit.
The Base toolkit list contains a list of toolkits for which support already exists. After you create and deploy support for your own toolkits, they are displayed in the list as well.
When the wizard creates the new custom toolkit support set, it creates a new toolkit support class. This new toolkit support class extends the toolkit support class of the base toolkit you select. As a result, the new custom toolkit support inherits all of the necessary utility methods for basic functionality (for example, event handling and dispatching) from the base toolkit support.
Custom toolkit class locations. A list of the locations of the custom classes you want to support in this project. You can specify Eclipse projects, .jar files, and Java class folders (the file system folders containing the compiled Java classes).
When the new project is built, these locations are added to the project build path.
The build path must also include the locations of all parent classes of the custom classes. Add these locations manually to the build path in your project if any custom classes are not derived directly from SWT, AWT, or JFC (Swing) and the parent classes are not located in the same location as the custom classes.
Note:
- The Custom Class Selection Screen in the New Custom Support Class Wizard displays the custom classes from the locations you list in this box. This enables you to select the required custom class when creating a custom support class. (You create custom support classes after the new project is built.)
- To add or remove custom class locations in a project after it is created, use the Properties dialog box for Java Add-in Extensibility projects.
To add custom toolkit class locations to the list:
Add the locations of the custom toolkit classes using one or more of the following options:
Click Add project to select an Eclipse project. The Select Project dialog box opens and displays the projects in the current Eclipse workspace.
Select the check box for the appropriate project and click OK to add it to the Custom toolkit class locations box.
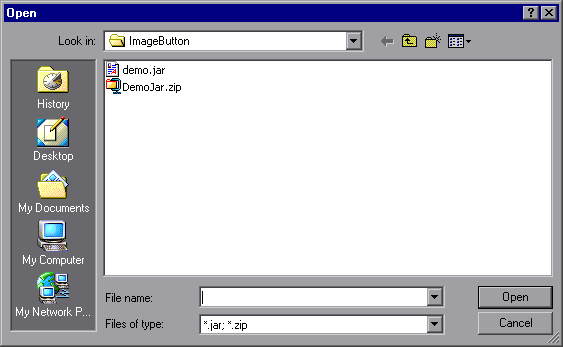
Click Add Jar to add a Java archive (.jar) file. The Open dialog box opens.

Browse to the appropriate Java archive file, select it, and click OK to add it to the Custom toolkit class locations box.
Click Add Class Folder to add a class folder. The Select Folder dialog box opens.
Browse to the appropriate folder, select it, and click OK to add it to the Custom toolkit class locations box.
Note: Select the root folder that contains the compiled class packages. For example, the file ImageButton.java defines the class com.demo.ImageButton. When you compile this class and store the result in the bin folder, the class file ImageButton.class location is: bin\com\demo\ImageButton.class. If you want to select the location of this class for the Custom toolkit class locations, select the bin folder.
To remove custom toolkit class locations from the list:
Select the location in the Custom toolkit class locations box and click Remove.
Project Summary Screen
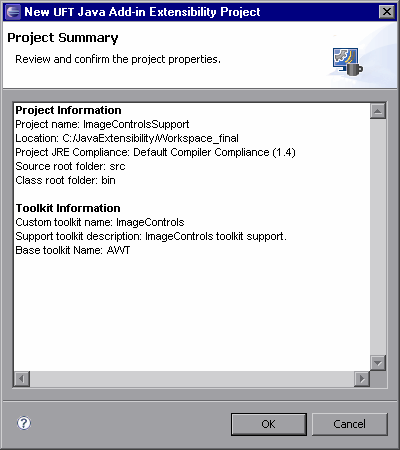
Before the wizard creates the custom toolkit support files, the Project Summary screen summarizes the specifications you provided for the new Java Add-in Extensibility project.

Review the information. If you want to change any of the data, click Cancel to return to the Custom Toolkit Details Screen. Use the Back and Next buttons to open the relevant screens and make the required changes.
If you are satisfied with the definitions, click OK. The wizard creates new Java Add-in Extensibility project, containing the following items:
The toolkit root package: com.mercury.ftjadin.qtsupport.<Custom Toolkit Name> containing:
The toolkit support class in the toolkit root package: <Custom Toolkit Name>Support.java
The support class sub-package: com.mercury.ftjadin.qtsupport.<Custom Toolkit Name>.cs
A folder for configuration files named Configuration. It contains:
The <Custom Toolkit Name>.xml toolkit configuration file. For information on the content of this file, see The Custom Toolkit Support Set.
The TestObjects folder for test object configuration files.
For information on the content of this class, see Understanding the Toolkit Support Class.
Note: If you have more than one Java Run-time Environment (JRE) installed on your computer, and one or more of the custom toolkit class locations you specified were Eclipse projects, make sure that the custom toolkit projects and the new Java Add-in Extensibility project are using the same JRE. If they are not, modify the JRE for one or more of the projects so that all of the projects use the same JRE.
 See also:


