
Share this page


Filters
You can apply filters to grids, smart lists, and board views, to filter for items with specific attributes.
This topic discusses quick and advanced filters. For details on other filter options, see Dynamic filters for dashboards, andOther filters.
Overview
Quick filters and advanced filters are used in different ways.
| Filter | Description |
|---|---|
| Quick filters |
Define filters that you want to turn on and off or change frequently. The quick filters are available in the quick filter sidebar. |
| Advanced filters |
Define complex combinations of filters, including filter groups and nested levels. The advanced filters are available in a dialog box that you can open from the toolbar. |
Quick filters and advanced filters are applied independently of one another. Both filter mechanisms are applied to the grid using AND logic. A summary of the quick and advanced filters is displayed above the grid:

If the same field is used in both the quick and advanced filters, an alert displays warning of potential conflicts between the filters. You can remove filters directly from the summary bar.
Tip: If you set up a filter and you do not see the expected results, check the following:
- No unwanted filters are active.
- The active filters do not have conflicting fields or values.
- The Show descendants filter is set correctly. For details, see Other filters.
Quick filters
When using quick filters, you first choose the fields you want to filter by, and add possible values under each field. Then, you activate only the values you want at any given time. You can turn values on and off as needed, without removing them entirely from the filter.
To set up quick filters:
-
Click the Show quick filters button
 to open the quick filter sidebar.
 -
In the filter sidebar, click the Choose Fields button + and select the fields to include in the filter.
-
Under a field, click the Add <field> filter button
 and select possible values for the field. You do not need to filter by all of these values at once. You are adding options to have available that you can activate and deactivate.
 -
Filter the grid using the values you chose. For details, see Quick filter controls.
-
To remove a value from the available options, click the x in the value box.
-
To remove an entire field from the filter, click the More button ••• for the field, and select Remove from pane.
Quick filter controls
The following table describes how to activate and manage filters.
| Action | Procedure |
|---|---|
| Activate / Deactivate a value | Click a value to activate or deactivate it. The grid is filtered only by the active values. Values that are currently active are highlighted. |
| Activate a value and deactivate others in the field | Ctrl+click a deactivated value. |
| Exclude a value | Right-click a value to exclude it. This action sets the value with a Not equal to operator. The value is displayed with a strike-through notation. |
| Activate all / Deactivate all values for a field | Click the More button ••• for the field, and choose Select all or Deselect all. This option is available for multi-value fields. |
| Deactivate all values for all fields | Click Clear all. |
| Expand / Collapse fields |
Click the Collapse filter groups button |
 or Expand filter groups button
  . When collapsed, fields with active values are indicated by a notification dot.
When multiple values are activated for a field, the filters are evaluated according to the field type:
-
In single-value fields, such as Priority, if you activate multiple values, OR logic is applied: An item is displayed if any of the values are found in the item.
-
In multi-value fields, such as Tags or Test Type, if you activate multiple values, AND logic is applied: An item is displayed only if all values are found in the item.
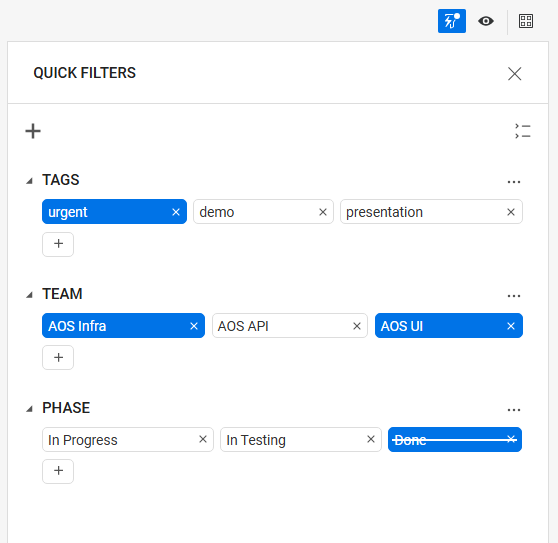
Example: In the following example, the items shown in the grid have the following properties:
- Tags include urgent
- Team is AOS Infra or AOS UI
- Phase is not Done
Advanced filters
Using advanced filters, you can apply complex combinations of filters, including nested levels of filter groups.
Tip: Watch a video introducing the advanced filters. See Video gallery.
To apply advanced filters:
-
Click the Advanced filter button
 in the toolbar to open the Advanced filters dialog box.
 -
Define the filter field, operator, and values.
You can set cross-filters to filter by a field's attributes. For details, see Cross-filters.
Note: Filtering is not possible on memo or long string fields. You can search memo and long string fields using the grid search. For details, see Search.
-
To add another filter, click + Add filter.
-
For multiple filters, select whether the filters are applied using And or Or logic.
The And or Or logic you select is applied to all filters at the same level.
- To add a filter group, which creates another nested level of filters, click + Add filter group. For details, see Filter groups.
- To undo your last edits, click Undo.
- To remove a filter, click the X button in its row.
- To filter by a value in the grid, right-click the value in the grid, and select Filter by <value> in the header. A filter for that field and value is added to the advanced filters. Any previous filter for the same field is replaced.
- To hide the Advanced filters dialog box, click outside the dialog box.
Note: In dashboard widgets, you can apply dynamic filters that control the data scope of multiple widgets together. For details, see Dynamic filters.
Filter operators
The operators available when defining a filter depend on the field type. Here is a selection of the available operators.
| Operator | Field types | Behavior |
|---|---|---|
| Starts with | String, list, reference | Returns items where the value starts with the entered text. For multi-value fields, returns items where at least one value starts with the entered text. |
| Contains | String, list, reference | Returns items where the value contains the entered text. For multi-value fields, returns items where at least one value contains the entered text. |
| Does not contain | String, list, reference | Returns items where the value does not contain the entered text. For multi-value fields, returns items where none of the values contain the entered text. |
| Matches / Does not match | String | Returns items where the value matches or does not match the entered text. Supports wildcards (*). |
Cross-filters
With a cross-filter, you can filter results by a field’s attributes. The Cross-filter button  is shown for fields that support cross-filtering.
For example, when filtering a list of defects, you can view all of the defects that belong to features that you are following. To set up this filter, you set the field of the filter to Feature and the cross-filter to Followed by me. The field of the filter is displayed as Feature.Followed by me.
Filter groups
Add a filter group to group multiple filters together. Filter groups enable you to create up to three nested levels of filters.
When adding a filter group, you define:
- Whether And or Or logic is applied to the group as a whole.
- Whether And or Or logic is applied to each of the filters within the group.
Example: In the following example, And logic is applied to the filter group as a whole, and Or logic is applied within the filter group.

The filtered results include items that have five or more story points, and fulfill at least one of the conditions in the filter group:
- Priority is High
- App Security Risk is Critical
- Predicted end date is today
Date filters
When you filter on date fields, you can combine operators such as is before or is after with relative values such as today, yesterday, or customizable Last/Next X-day ranges.
For example, with the condition Due date - is before - today, you can constantly keep track of all overdue items.
Share filters
You can share and reuse filters in the following ways:
-
Save a filtered grid or board as a favorite and share it with others. For details, see Favorites.
-
Copy and paste filters between modules. Copy filters from one Advanced filters dialog box and paste them in another. This allows you to reuse the same complex filter across different entities and modules. You can also copy filters to share them as text in any channel. For example, copy a filter from a defects grid to use it in a features grid, or share a filter definition with teammates via email or chat.
To copy filters:
-
In the Advanced filters dialog box, click the Copy button
 .
. -
In another Advanced filters dialog box, click the Paste filters button
 .
. -
Select one of the following paste options:
Paste option Details Add to current filters The copied filters are added to the current filters. Replace current filters The current filters are removed and replaced by the copied filters.
Note: Filters on fields that do not exist in the target entity or workspace are not copied. A blank filter row is added instead.


