ALM common areas

The ALM masthead, sidebar, and Pinned Items panel are common to all ALM views.

To access

The common areas are available from all ALM views.

Relevant tasks

Start ALM using ALM Client Launcher

Masthead

Displays the current domain, project, and user name and provides buttons for accessing other projects, common tools, and documentation.

User interface elements are described below:

UI Element

Description

Opens the Quality Insight page, the Global Search tab. See Globally search ALM data.
<Domain, Project>

Displays details of the current domain and project.

Click to switch to another open project on the same machine, or to select a different project from the Login window.

<User> Displays details of the current user.

Tools menu. Provides commands that you can run from each of the ALM modules.

Tools options include:

  • Customize. Opens the Project Customization window, enabling you to customize your project. For details, see Project customization.

    Tip: You can change your ALM password and user details in the Project Customization window. For user interface details, see Change your user properties.

  • Task Manager. Opens the Task Manager dialog box, enabling you to view the status and progress of asynchronous tasks run in your project. For details, see Task Manager.

  • Download Images.

    • Automatically. Enables automatic image download for memo fields.

    • On demand. Enables image download for memo fields on demand. This may help with a slow connection.

      Turn automatic image download for memo fields on or off for the entire site with the MEMO_FIELD_AUTO_DOWNLOAD_IMAGES site parameter. For details, see Set configuration parameters.

  • Copy project URL to clipboard. Copies the URL of the current project to the clipboard. You can paste the URL link into another location, such as an email or a document, or save it as a favorite view. Clicking the link prompts you to login and then the project opens.

  • Spelling and Grammar.

    • Spelling Options: Opens the Spelling Options dialog box, enabling you to configure the way ALM checks spelling.

    • Thesaurus: Opens the Thesaurus dialog box and displays a synonym, antonym, or related word for the selected word. You can replace the selected word or look up new words.

    • Check Spelling: Checks the spelling for the selected text or text box. If there are no errors, a confirmation message opens. If errors are found, the Spelling dialog box opens and displays the word together with replacement suggestions.

  • New Defect. Opens the New Defect dialog box, enabling you to add a new defect. For details, see Defect Details Dialog Box.

Tip: To customize the Tools menu, refer to the Application Lifecycle Management Installation and Upgrade Guide.

Help on this page. Displays help for the current page.

Close Project. Logs you out of your current project and returns you to the ALM Login window.
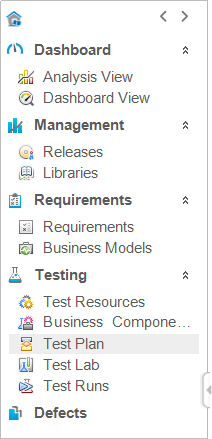
Back to top

Sidebar

This area contains buttons for navigating between ALM views, switching between ALM modules, and accessing various online resources.

Important information

ALM Editions:ALM is also available in several editions which provide subsets of ALM functionality. For information about ALM editions and their functionality, see ALM editions. To find out which edition of ALM you are using, ask your ALM site administrator.

If the sidebar is hidden, click the expand button.

User interface elements are described below:

UI Element

Description

Opens the ALM landing page. For details, see ALM Homepage.

Enables you to navigate to your previous/next view in ALM.

Tip: Use the Forward button after you navigate to a previous view.

Dashboard

Includes the following modules:

  • Analysis View. Enables you to create graphs, reports, and Excel reports.

  • Dashboard View. Enables you to create dashboard pages, in which you can view multiple graphs in a single display.

Management

Includes the following modules:

  • Releases. Enables you to define releases and cycles for the application management process.

  • Libraries. Enables you to define libraries to track changes in your project, reuse entities in a project, or share entities across multiple projects.

Requirements

Includes the following modules:

  • Requirements. Enables you to manage requirements in a hierarchical tree-structure. Requirements can be linked to other requirements, tests, or defects.

  • Business Models. Enables you to import business process models, and test the quality of the models and their components. Access to this module is dependent on your ALM license.

Testing

Includes the following modules:

  • Test Resources. Enables you to manage test resources in a hierarchical tree-structure. Test resources can be associated with tests.

  • Business Components. Depending on your ALM license, you may also have access to the Business Components module. This module enables subject matter experts to drive the quality optimization process using Business Process Testing. For details, refer toBusiness components overview.

  • Test Plan. Enables you to develop and manage tests in a hierarchical tree-structure. Tests can be linked to requirements and defects.

  • Test Lab. Enables you to manage and run tests.

  • Lab Management: Build Verification.Enables you to define a suite of automated functional test sets bundled together with a single performance test (called a build verification suite) to provide an end-to-end deployment and testing solution.

  • Lab Management: Timeslots. Enables you to reserve testing resources for the purposes of running a test or for performing maintenance tasks on them.

  • Test Runs. Enables you to analyze the results of test executions.
Lab Resources

Includes the following modules:

  • Testing Hosts. Enables you to manage the allocation and availability of hosts for performance and functional testing.

  • AUT Environments. Enables you to manage AUT environment parameters which can be used for performance and functional testing.

Defects

Enables you to add defects, determine repair priorities, repair open defects, and analyze the data.

Help

Enables you to open additional online Application Lifecycle Management resources.

Displays version information for each ALM client component.

Tip: To rename, rearrange or delete items in the Help menu, refer to the Application Lifecycle Management Installation and Upgrade Guide.
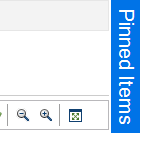
Back to top

Pinned Items Panel

When you click Pinned Items, a panel opens to display the ALM items you have pinned. You can click a pinned requirement, test, or defect to jump to it quickly.

  • To pin a requirement, test, or defect, select it and click the Pin/Unpin button. The item is added to the Pinned Items panel.

  • To unpin a pinned requirement, test, or defect, select it and click the Pin/Unpin button, or in the Pinned Items panel, click in the item you want to unpin.

  • To hide the Pinned Items panel, move the cursor away from the panel.

For details, see Pin items.

Back to top