Share this page


View, upload, and manage apps
Note: Full multi-workspace functionality described here is only available with a Trial, Enterprise, or Ultimate license. If you install an Express or Pro license, or if you move from a Trial license to an Express or Pro license, you will only be able to upload apps as shared assets.
In this topic:
View app details
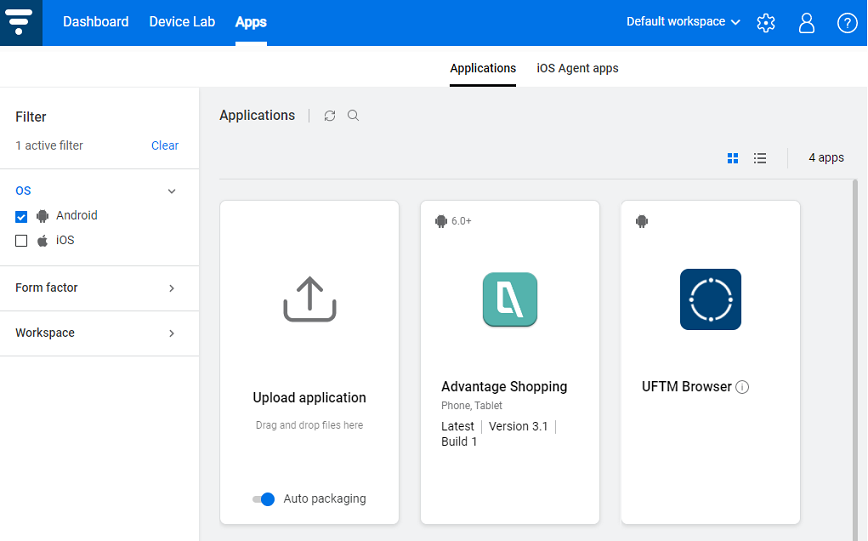
View the apps in either List or Card view by toggling between List  and Card
  in the upper right corner.
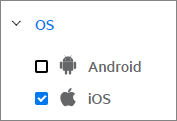
Tip: Use the filter panel to limit what items are displayed, to focus on the information that is important to you. Filter by OS
Apps are displayed with the following summary details:
- Name of the app
The app name may contain I18N characters. - Operating system
Android or iOS. When the app requires a minimum OS version, this is indicated next to the OS icon. - SV enabled
Whether this app is packaged for Service Virtualization. For details, see Set up Service Virtualization (SV). - Upload number, version and build number
Tip: Hover over the version or build number in card view to display a tooltip with the date and time of the latest upload. - Compatible device types (card view)
Indicates what type of devices are compatible with the app - Phone, Tablet, or both. -
Workspace name
The workspace to which the app is uploaded.
Note: System apps are not assigned to a specific workspace.
Apps that were uploaded in an earlier version of UFT Mobile and could not be repackaged during the upgrade, will be blurred and shown with a red icon in the top left corner. For information on manually repackaging an app, see Package an iOS app manually with the packager service or Package an Android app manually.

Options toolbar
In card view, hover over a card to display the options toolbar. In list view, select an app from the list to enable the following toolbar options:
| Card view | List view | |
|---|---|---|

|

|
Delete. Deletes all uploads of the app |

|

|
More information. Opens the Details window of the app. |
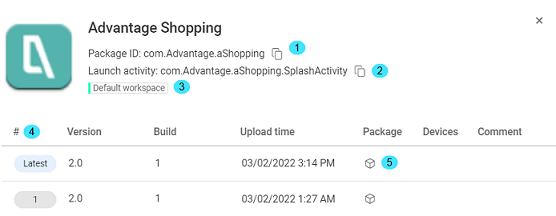
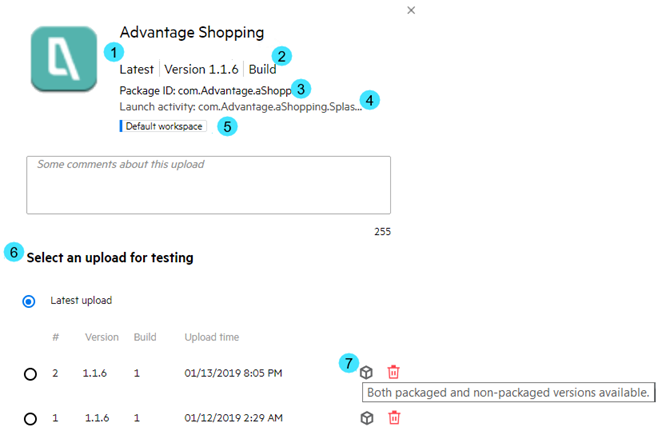
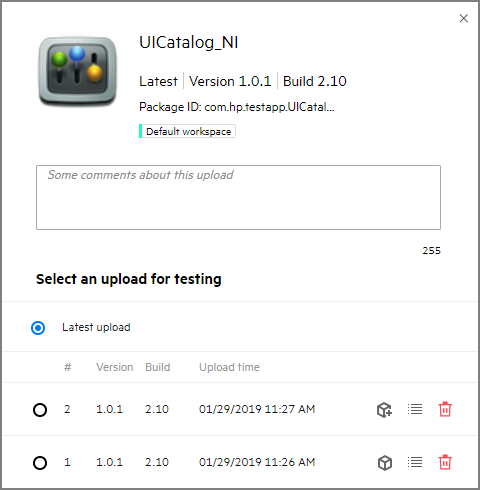
App details window

|
This is the unique identifier for the app. This information is taken directly from the manifest file of the app. Use the copy icon  to copy the package ID. to copy the package ID. |

|
Android apps only: The name of the Android activity to run when the app is launched. Use the copy icon to copy the launch activity. |

|
The workspace to which this app belongs. For more details, see Lab and workspace management. |

|
Displays all the app uploads
|
 |
Hover over the icon in the Package column to see the app packaging status:
For more details, see When to use a packaged app. |
 Only a non-packaged version is available. Click this icon to begin packaging the app for the selected upload.
Note: In certain installations, there will be additional information:
- For iOS apps, there will be an option to view the list of devices included in the provisioning profile, indicating the devices on which the app can be installed. For details, see Device provisioning information.
- For apps uploaded after Service Virtualization was enabled, there will be an indication of the SV Enabled services, such as Bluetooth, NFC, and REST API. For details, see UFT Mobile integration in the SV Help Center.
Device provisioning information (iOS only)
Provisioning is the process of preparing an app to launch on devices. As part of this process, a match is required between the provisioning profile embedded in the app and the one installed on the device. If you have an Enterprise certificate, all devices are included. If you have a development certificate, make sure that the UDID of your device is listed in the provisioning profile.
For information on how to create a provisioning profile, see Generate a development provisioning profile.
To check whether your upload can be installed:
- In App view, click the More information icon of the iOS app whose upload you want to test.
-
Hover over the icon in the Devices column to see the details for a specific upload:
-
 The app is signed with an enterprise certificate and can be installed on all devices.
 -
 The app is signed with a development certificate. Click the icon for the list of devices included in the provisioning profile.
-
Upload an app
Upload an app in one of the following ways:
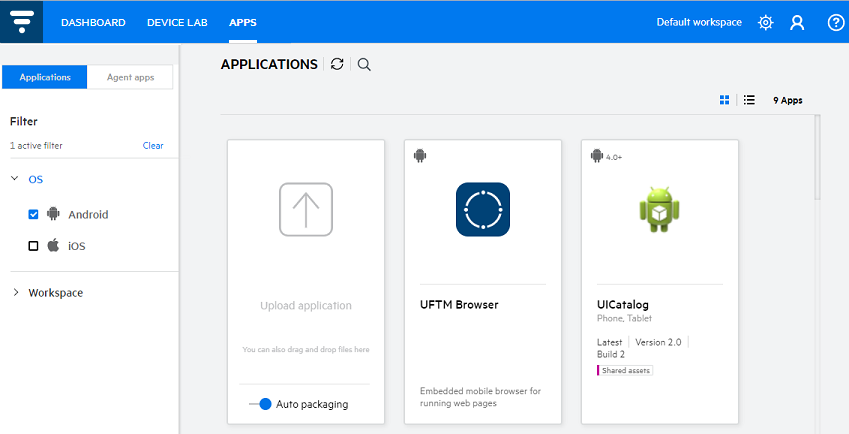
- For all users: Click the Apps tab. In the Applications window click
 Upload application . Select the app to upload.
 -
For admins only:
- In Administration
 , click the MANAGEMENT tab.
 - In the left pane, click Lab Management.
- Select ALL APPS to view all the apps in your lab.
- Click the Upload button and specify the path to the app and select a workspace.
- Click UPLOAD.
- In Administration
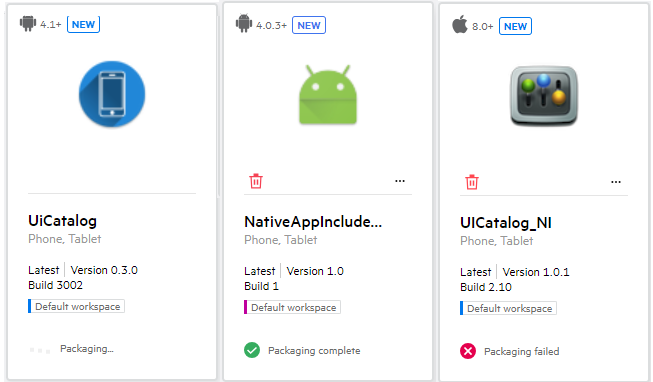
When you upload an app with the Auto packaging toggle enabled, the packaging status (Packaging…,Packaging complete, or Packaging failed) is indicated on the app card and also in List view. For more details on packaging, see App packaging and signing services.
While packaging is in progress, hover over the packaging status and click the Refresh icon to see the most up-to-date packaging status.
If you have not configured iOS packaging and signing services, when you upload an iOS app and the auto-packaging toggle is set to ON, packaging will fail.
Note:
- If you are using a Pro or Express license, the app is uploaded to the shared assets.
-
Uploading apps will be blocked if the space allocated for storage is full. File storage space is defined by the administrator in the administration settings. For details, see File storage.
- If you open the UFT Mobile wizard from an integration tool, such as UFT, the workspace selection drop down is not shown—it uses the workspace configured in the testing tool.
- The maximum file size that you can upload is 1 GB.
Agent apps
Admin users view and manage the Agent apps from the Agent apps tab in the Apps screen. These apps are not visible to users.
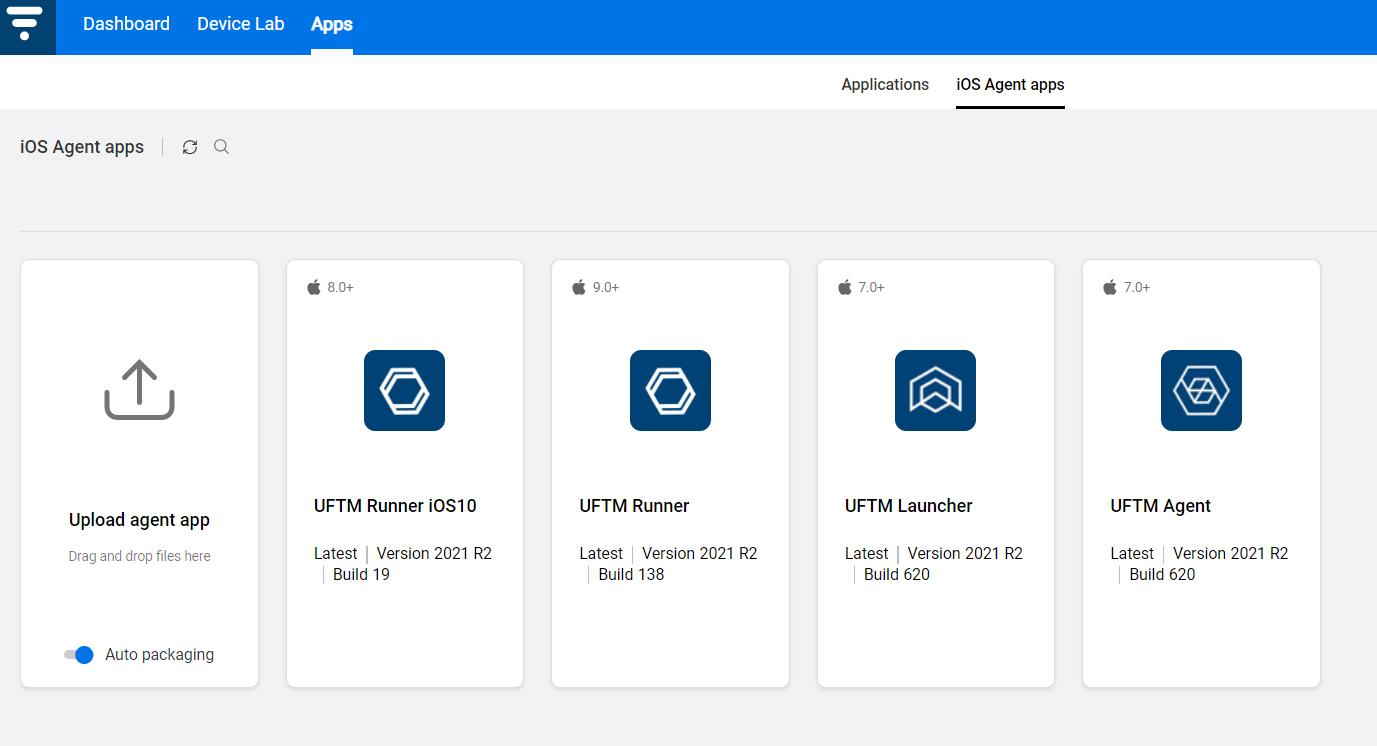
The Agent apps are standard iOS applications that needs to be installed on each device that you want to use with UFT Mobile. These provide a communication channel between the device and UFT Mobile.
The Agent apps must be re-signed with a development certificate of an Apple Developer Account, and a development provisioning profile belonging to the same account. These provide the identity of the developer, and the list of devices on which distribution of the app is allowed. For more details, see Re-sign the Agent apps.
Admin users can see the status of these apps by clicking the More icon on an Agent app card, or by selecting the app and clicking More information in the toolbar above the list of Agent apps.
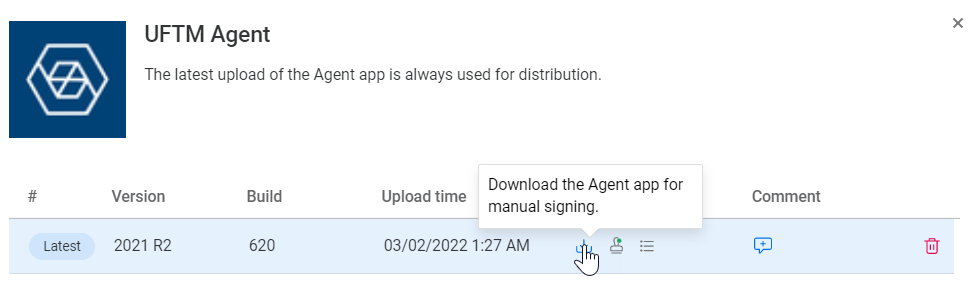
Sign and distribute the Agent apps
Admin users can also automatically sign an Agent app from the app card (if the packaging service has been set up).
To sign an Agent app:
In the app card, click the  icon, or download the app for manual signing.
To sign the Agent apps with a different provisioning profile, for example if new devices were added to the provisioning profile, click  . The Agent apps will be signed with the selected provisioning profile.
- Note:
-
The automatic packaging service must be set up to use this option. If automatic packaging is not configured, download the apps, manually sign them with the new provisioning profile, and then re-upload them to UFT Mobile.
-
The uploaded provisioning profile is used for a one-time signing of the Agents. It does not replace the provisioning profile defined in the remote packaging service settings.
-
This option is supported only when using the remote packaging service. When using the embedded service, you can replace the certificate and provisioning profile in Administration settings > iOS packaging service.
To distribute the signed Agent apps to connectors:
-
Navigate to Device Lab> Connectors, select the required connectors in the grid, and click Distribute Agents
 .
. -
After the updated Agent apps have been distributed to connectors, select the relevant connectors from the grid and click Reconnect Devices.
For more information, see View and manage connectors in View and manage devices. Note that even if an earlier upload of an Agent app is selected in the app card, the latest upload is always used for distribution to connectors.
System apps
Several built-in apps are provided with your installation:
|
UFTM Browser |
Use this for measuring transaction response time (TRT) when using TruClient. The UFTM Browser apps can't be deleted or updated. For more details, see UFTM Browser Apps. |
| Advantage Shopping |
The Advantage Shopping app is available for devices with iOS 8.2 and higher and Android devices versions 4.4 and higher. This app is a sample online store for home electronics. It has a standard online shop interface, with common features such as search and a shopping cart. |
Troubleshooting
Why can't I see all my apps?
Check the filter panel to see what options are selected. UFT Mobile displays only the items that fit the filter conditions. To display all items, select all the filter options and clear the search field of any text that you have entered.
Blue text in the filter pane indicates an active filter.
In this topic:
View app details
When you upload an app with Auto packaging enabled, the packaging status is indicated on the app card, and also in List view: Packaging…, Packaging complete, or Packaging failed. While packaging is in progress, hover over the packaging status and click the Refresh icon to see the most up-to-date packaging status.
Note that if you have not configured iOS packaging and signing services, when you upload an iOS app and the auto-packaging toggle is set to ON, packaging will fail.
Tip: Use the filter panel to limit what items are displayed, to focus on the information that is important to you. Filter by OS
View the apps in either List or Card view by toggling between List and Card in the upper right corner.
To see app details in the List view, select an app and click More. In Card view, the apps are displayed with the following summary details:
- Name of the app
The app name may contain I18N characters. - Operating system
Android or iOS. When the app requires a minimum OS version, this is indicated next to the OS icon. - SV enabled
Whether this app is packaged for Service Virtualization. For details, see Set up Service Virtualization (SV). - Upload number, version and build number
- Hover over the version or build number to view a tooltip with the date and time of the latest upload.
- Compatible device types
Indicates what type of devices are compatible with the app - Phone, Tablet, or both. -
Workspace name
The workspace to which the app is uploaded.
Note that System apps are not assigned to a specific workspace. - Auto packaging
A toggle switch indicating that all apps uploaded in the future should be packaged automatically. For more details on packaging, see App packaging and signing services.
Apps that were uploaded in an earlier version of UFT Mobile and could not be repackaged during the upgrade, will be blurred and shown with a red icon in the top left corner. For information on manually repackaging an app, see Package an iOS app manually with the packager service or Package an Android app manually.
Agent apps
Admin users view and manage the Agent apps from the Agent apps tab in the Apps screen. These apps are not visible to users.
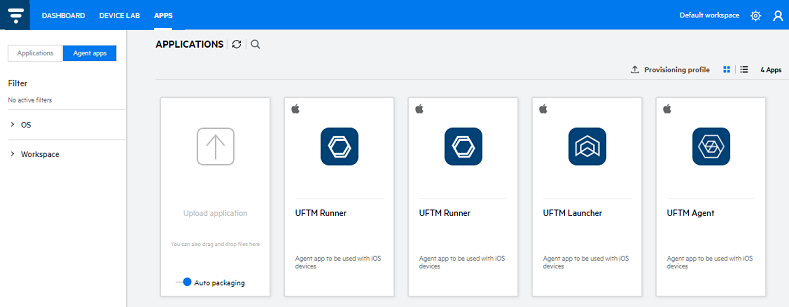
The Agent apps are standard iOS applications that needs to be installed on each device that you want to use with UFT Mobile. These provide a communication channel between the device and UFT Mobile.
The Agent apps must be re-signed with a development certificate of an Apple Developer Account, and a development provisioning profile belonging to the same account. These provide the identity of the developer, and the list of devices on which distribution of the app is allowed. For more details, see Re-sign the Agent apps.
Admin users can see the status of these apps by clicking the more  icon on an Agent app card. They can also automatically sign an Agent app from the app card (if the packaging service has been set up) by clicking the icon, or download the app for manual signing.
To sign the Agent apps with a different provisioning profile, for example if new devices were added to the provisioning profile, click . The Agent apps will be signed with the selected provisioning profile.
- Note:
-
The automatic packaging service must be set up to use this option. If automatic packaging is not configured, download the apps, manually sign them with the new provisioning profile, and then re-upload them to UFT Mobile.
-
The uploaded provisioning profile is used for a one-time signing of the Agents. It does not replace the provisioning profile defined in the remote packaging service settings.
-
UFTM 2021 R1: This option is supported only when using the remote packaging service. When using the embedded service, you can replace the certificate and provisioning profile in Administration settings > iOS packaging service.
To distribute the signed Agent apps to connectors, navigate to Device Lab> Connectors, select the required connectors in the grid, and click Distribute Agents . After the updated Agent apps have been distributed to connectors, select the relevant connectors from the grid and click Reconnect Devices.
For more information , see View and manage connectors in View and manage devices. Note that even if an earlier upload of an Agent app is selected in the app card, the latest upload is always used for distribution to connectors.
System apps
Several built-in apps are provided with your installation:
UFTM Browser
Use this for measuring transaction response time (TRT) when using TruClient.
The UFTM Browser apps can't be deleted or updated. For more details, see UFTM Browser Apps.
Advantage Shopping
The Advantage Shopping app is available for devices with iOS 8.2 and higher and Android devices versions 4.4 and higher.
This app is a sample online store for home electronics. It has a standard online shop interface, with common features such as search and a shopping cart.
Options toolbar
Card view
Hover on an app to show the following options in a floating toolbar:
- Delete. Deletes all uploads of the app
- More . Opens the Details page of the app as shown below:
|
|
This is the specific upload of the app selected for testing. If you introduce changes to your app between uploads, you may want to test the differences between the various uploads of the application. By default, the latest upload is always selected for testing. |
|
|
This is the version & build number of the app. UFT Mobile takes this from the manifest file of the app. |
|
|
This is the unique identifier for the app. This information is taken directly from the manifest file of the app. You can also filter by this name. |
|
|
Android apps only: The name of the Android activity to run when the app is launched. |
|
|
Lists the workspace to which this app belongs. For more details, see Lab and workspace management. |
 |
Displays all the app uploads
|
 |
For more details, see When to use a packaged app. |
Note: In certain installations, there will be additional information:
Beneath the Package ID, the app details will show the workspace to which the app was uploaded.
- For iOS apps, there will be an option to view the list of devices included in the provisioning profile, indicating the devices on which the app can be installed. For details, see Device provisioning information below.
- For apps uploaded after Service Virtualization was enabled, there will be an indication of the SV Enabled services, such as Bluetooth, NFC, and REST API. For details, see Set up Service Virtualization (on-premises).
List view
In List view, the following actions are available for a selected app:
- Auto packaging. Automatically package all apps that are uploaded.
 Delete. Delete all uploads of the app
- More . Displays the full details of the app.
Device provisioning information (iOS only)
Provisioning is the process of preparing an app to launch on devices. As part of this process, a match is required between the provisioning profile embedded in the app and the one installed on the device. If you have an Enterprise certificate, all devices are included. If you have a development certificate, make sure that the UDID of your device is listed in the provisioning profile.
For information on how to create a provisioning profile, see Generate a development provisioning profile.
To check whether your upload can be installed:
- In the App view, click on the More information icon in the app whose upload you want to test.
-
Select the upload you want to test, and hover on the icon in the App Details screen. The tooltip shows the status of the selected upload:
-
Signed with an enterprise certificate and can be installed on all devices.
-
Signed with a development certificate. Click on the icon for the list of devices included in the provisioning profile.

-
If the provisioning profile of an iOS app that you select to install on a specific device does not include that device, a warning icon ![]() will be displayed, and you will not be able to proceed with your selection. Note that this only applies when selecting a specific device, and not if you select a device by capabilities.
will be displayed, and you will not be able to proceed with your selection. Note that this only applies when selecting a specific device, and not if you select a device by capabilities.
Upload an app
Upload an app in one of the following ways:
- For all users: Click the APPS tab. In the APPLICATIONS pane click Upload (list view) or Upload application (card view). Select the app.
-
For admins only:
- In Administration , click the MANAGEMENT tab.
- In the left pane, click Lab Management.
- Select ALL APPS to view all the apps in your lab.
- Click the Upload button and specify the path to the app and select a workspace.
- Click UPLOAD.
- In Administration
Note:
- If you are using a Pro or Express license, the app is uploaded to the shared assets.
-
Uploading apps will be blocked if the space allocated for storage is full. File storage space is defined by the administrator in the administration settings. For details, see File storage.
- If you open the UFT Mobile wizard from an integration tool, such as UFT, the workspace selection drop down is not shown—it uses the workspace configured in the testing tool.
- The maximum file size that you can upload is 1 GB.
Troubleshooting
Why can't I see all my apps?
Check the filter panel to see what options are selected. UFT Mobile displays only the items that fit the filter conditions. To display all items, select all the filter options and clear the search field of any text that you have entered.
Blue text in the filter pane indicates an active filter.
 See also: