
Share this page


Common AccuWork Commands
The following AccuWork operations can be invoked from multiple locations within the Web UI.
Open Issue
This command can be invoked by right-clicking on any list of issues in the Web UI. These lists can be generated:
- In the Query Results pane in the Query Browser
- As a result of a Show Active Issues (see Show Active Issues) or Diff Against Basis (by Issues) (see Diff Against) command.
An issue can also be opened by double-clicking it.
The issue opens in one of two places:
- In the Issue Edit Form
- In a third-party Web-based issue tracking system, if the Web UI has been configured to do so
(You can configure the Web UI to use different issue tracking systems; contact your Web UI system administrator for details if this command does not perform as you expect.)

Bulk Update
This command can be invoked via the ![]() button or the context menu (right-click) on any ungrouped issue list shown in the Web UI. The command displays a dialog box, which allows you to specify one or more fields to update, and assign new values to them.
button or the context menu (right-click) on any ungrouped issue list shown in the Web UI. The command displays a dialog box, which allows you to specify one or more fields to update, and assign new values to them.
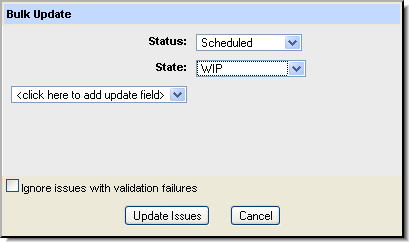
Click the Update Issues button to update these fields in the selected issues with the values you specified.
AccuRev applies validation rules during the bulk update operation, and displays an error if a rule is violated by the bulk update. The Ignore issues with validation failures checkbox skips issues with validation errors. See Understanding Issue Form Validation for more information.
Sum Columns
The Sum Columns command allows you to easily sum certain fields for issues displayed in the Web UI. For example, you might want to sum the Dev Est Time field for the issues displayed in the Query Results pane in the Queries tab.
AccuRev sums any fields that have been defined in the AccuRev schema as:
- Text fields, as long as they contain numeric data
- Timespan fields
If the issues you have selected do not contain any fields with these data types, AccuRev displays a warning message. Clear the message and select different issues before trying the sum operation again.
You can sum columns in one or more issues. Use Ctrl+ click and Shift+ click to select the issues whose columns you want to sum.
Summing Columns
To sum columns:
- Display a tab that lists one or more issues (like the Query Results pane after executing a query, for example).
- Select the issues whose columns you want to sum.
-
Click the Sum Columns button (
 ).
).Alternative: Choose Sum Columns from the context menu (right-click to display) in any issue list shown in the Web UI.
AccuRev displays the Sum Columns dialog box.
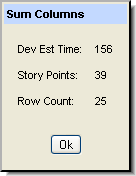
The Sum Columns dialog box displays:
- The sum of the columns for selected issues (Dev Est Time and Story Points in the preceding illustration).
- The number of issues selected (Row Count).
- Click Ok to close the Sum Columns dialog box.
Calculate Columns
The Calculate Columns command allows you to perform basic mathematical operations (add and subtract, for example) on any two columns for issues displayed in the Web UI. For example, you might want to subtract the Dev Actual field from the Dev Estimate field for the issues displayed in the Query Results pane in the Queries tab.
When you execute the Calculate Columns command, AccuRev adds a new column to the table to display the result of the calculation. You can name this column at the time you specify the calculation.
AccuRev lets you calculate any fields that have been defined in the AccuRev schema as:
- Text fields, as long as they contain numeric data
- Timespan fields
- Timestamp fields
If the issues do not contain any fields with these data types, AccuRev displays a warning message. Clear the message and choose fields with numeric values before trying the calculate operation again.
How to Calculate Columns
- Display a tab that lists one or more issues (like the Query Results pane after executing a query, for example).
-
Click the Calculate Columns button (
 ).
).AccuRev displays the Calculate Columns dialog box.
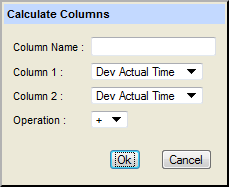
- Complete the fields in the Calculate Columns dialog box as follows:
|
Field Name |
Action |
|---|---|
|
Column Name |
Enter a name for the column that will display the result of the calculation. |
|
Column 1 |
Select the first column you want to use in the calculation. |
|
Column 2 |
Select the second column you want to use in the calculation. |
|
Operation |
Select the operation you want AccuRev to perform. |
-
Click Ok.
AccuRev performs the calculation and displays the results in a new column.
Query URLs
AccuRev automatically builds a URL for queries with calculated columns that includes information about the calculation you specified: the name of the new column, the names of the columns selected for the calculation, and the operation selected for the calculation. If you set your query to Public, you can:
- Send the URL using the default e-mail client configured in you Web browser.
- Render the URL in a new tab in the Web browser. This enables you to copy the URL.
If your query is set to Private, you cannot access the query’s URL.
See Using URLs to Access Data for more information on this topic.
To access the query URL:
- If necessary, set the query to Public: in the Web UI Query Browser, right-click the query and choose Set as Public from the context menu.
-
Right-click the query and choose Query Link from the context menu.
The Query Link dialog box appears:
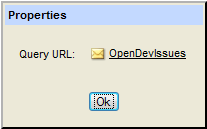
- To send an e-mail containing the query’s URL, click the envelope button.
To open a new tab in your Web browser that opens to the query’s URL, click the query name.
Show Percentages
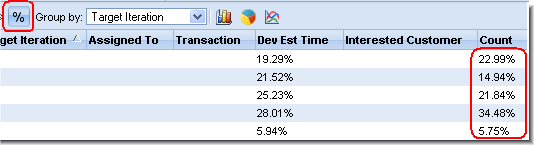
Show Percentages (![]() ) toggles the display of percentage information for columns that contain numeric data. If you have specified the display of Groups (see the next section), the Count column also toggles to percentages. This is useful for columns such as “estimated time” to see which issues in the current table are expected to take up the most development time. See Group Issues by Field for more details.
) toggles the display of percentage information for columns that contain numeric data. If you have specified the display of Groups (see the next section), the Count column also toggles to percentages. This is useful for columns such as “estimated time” to see which issues in the current table are expected to take up the most development time. See Group Issues by Field for more details.
Group Issues by Field
This command can be invoked via the Group by drop-down list on the issue list toolbar. The drop-down shows the issue fields that these issues can be grouped by. Choose a field to group the issues by that field.
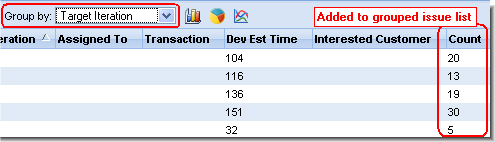
The resulting issue list shows one line for each value of the chosen field. A Count column is added to the grouped issue list, which contains the number of issues for each value of the chosen field.
To toggle the display in this column to show percentages, click the ![]() Show Percentages button.
Show Percentages button.
Columns in the list will either:
- Show the sum of all values in that column for the value of the chosen field. Text fields with numeric-only data and Timespan fields can be summed in this way. Fields with date information default to grouping by day. For example, there were 20 issues in target iteration 1 (as shown in the first line of the image above), and the sum of the developer's estimated time (Dev Est Time column) for that iteration was 104 hours.
- Show nothing. This means that the field does not contain numeric values which can be summed.
To remove the grouping, choose <none selected> from the Group by drop-down.
Charts
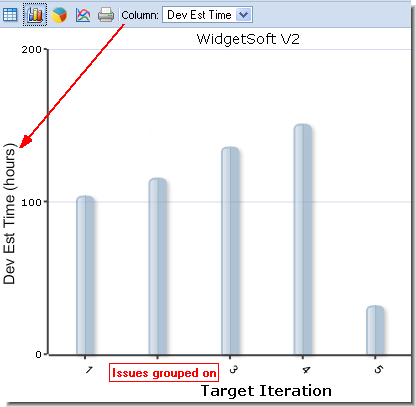
When the Group By option is in effect, three graphical chart options—bar, pie, and line—become available on the toolbar and the context menu, allowing you to display query results in a graphical format.
![]() Bar Chart
Bar Chart
![]() Pie Chart
Pie Chart

![]() Line Chart
Line Chart
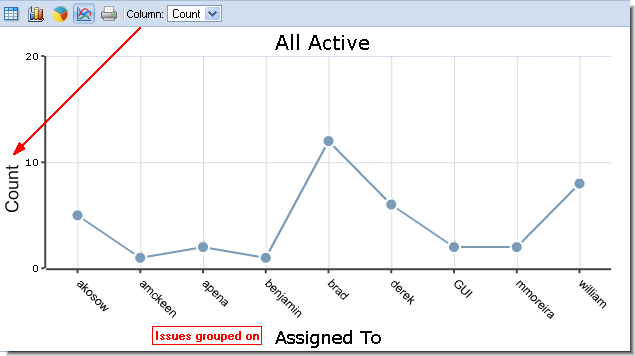
The field that the issues are grouped by creates the horizontal axis of the bar chart or the labeled sections of the pie chart. The leftmost column with summed data creates the vertical axis of the bar and line charts or the sizing for the wedges of the pie chart. This value can be changed using the Column drop-down list on the chart's toolbar.
To return to the list of grouped issues, click the Show Issue Table ![]() button on the issue list toolbar. Following are examples of bar, pie, and line charts.
button on the issue list toolbar. Following are examples of bar, pie, and line charts.
Tip: You can distribute URLs of query results displayed as groups and charts. See Linking to Charts and Grouped Issues.
Printing charts
To send a chart to the printer:
-
Click the Print button (
 ) on the toolbar.
The chart appears in a separate browser window or tab with its own Print button (
 ).
). -
Click the Print button (
) button.The standard Print dialog box appears.
- Specify settings as required and click OK.
Linking to Charts and Grouped Issues
You can distribute URLs for groups and charts created for public query results. For example, you can run a query, group results by a specific field, and then render those results as a pie chart. If you want to share that chart, you can create a URL to provide other AccuRev users with access.
To create the URL, right-click the query and choose Properties from the context menu. This allows you to save or email the link for the query result. See Using URLs to Access Data for more information.
Note: If the field used to create the group changes—if you remove it from the columns displayed for the query results or change the Group By value, for example—the URL will no longer work.
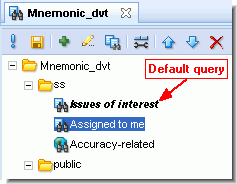
Set as Default
This command allows you to specify a default query—the query that is run automatically when you open the Query Browser. The name of a query that has been specified as the default query is bold and italicized in the Query List Pane. You can invoke the Set as Default command from the context menu in the Query List pane.
Set as Public
By default, queries you create are private—they are accessible only by you. This command allows you to make a private query a public query. Public queries are accessible by all AccuRev users.
Set as Private
This command allows you to make a public query you have created a private query. Private queries are accessible only by you.
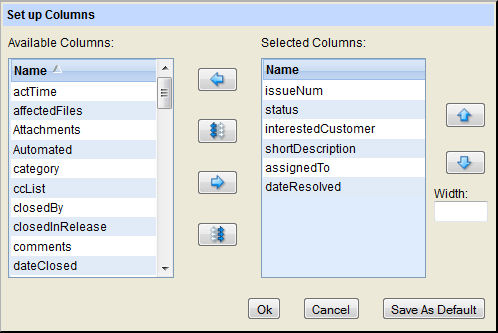
Set up Columns
The Set up Columns dialog box lets you specify the columns to include in query results and, optionally, save the columns you select as a default to be used to display query results for any new queries you create. You use the Set up Columns button (![]() ) on the Query List Pane or Query Pane toolbar to display this dialog box.
) on the Query List Pane or Query Pane toolbar to display this dialog box.
- You use the Set up Columns dialog box to specify:
- A set of fields from an AccuWork issue database
- The order in which those fields will appear in the results
- Whether or not you want to save selected columns as a default
Choosing Columns
The dialog box contains several buttons to move the fields:
- To move field names from the Available Columns list to the Selected Columns list (or vice-versa), select one or more names, then click the
 or
or  button.
 - To move all field names between the lists, click the
 or
or  button.
 - To rearrange the Selected Columns list, select one or more names, then click the
 or
or  button.
You can also specify the width of a column in pixels: click on the column in the Selected Columns list, then enter the desired value in pixels in the Width: field.
When you click Ok to close the dialog box, the changes you have made are reflected immediately in the Query Results pane. Changes to the query's column setup are not saved in the repository until you invoke the Save command in the Query List pane.
Notes:
- The names displayed in the Set Up Columns dialog box are the AccuWork field names as specified in the AccuWork Schema Editor in the Java GUI. The names displayed in query results are the corresponding AccuWork field labels.
- You must include at least one field in the Selected Columns list.
- Complete contents from multiple-line text fields are not always visible in the Web UI, but they are included in printed reports. See Reports About Issues for more information.
Saving Selected Columns as a Default
If you want to save the columns you select as the default set of columns to be used to display query results:
- Click the Save as Default button.
- Click Ok.
The results for the current query are displayed with the columns you selected as the default. In addition, this set of columns is used as the default for any new queries you create.
Run
This command runs the selected query and displays the resulting issues in the Query Browser or New Query Tab. It is invoked from the toolbar button or the context menu in the Query List pane.
Save
This command saves any changes to queries that you have made in the Query Browser, such as Set as Private/Set As Public commands to change the status of your queries (see Set as Public and Set as Private).
If you try to close a Query Browser tab in which you have made changes to one or more queries and have not yet saved them, AccuRev prompts you to save them.
How Queries are Stored
Your private queries are stored in the AccuRev repository within the depot's directory, in an XML-format file:
.../storage/<depot-name>/dispatch/config/user/<username>/query.xml
Each user's private queries are stored separately. The <username> directory in the query storage path name causes the private queries for each user to be stored separately.
Although your queries are stored in the depot, they are not version-controlled in the way AccuRev files are. For example, there is no command that displays or reinstates your queries as you saved them two days ago.
Show Change Package
This command shows the entries currently in the change package for the selected issue. You can run this command from context menus and toolbars in the Query Browser and Show Active Issues.
The entries are shown in a Changes tab, which lists the file name, version, and basis version for each element in the change package.
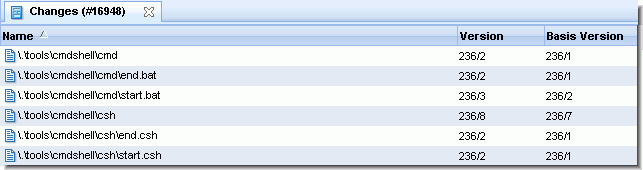
Entries are included for elements in the change package only if they were promoted to the stream, but have not yet been promoted from the stream to its parent. This helps you to concentrate on current programming efforts, rather than those that were completed long ago.
Note: For the purposes of the display on this tab, a Revert to Backed operation has the same effect as a Promote operation. For a workspace, substitute the phrase "created in" for "promoted to".
Show Active Issues
The Show Active Issues command displays in the Issues tab the active issues for the current stream. An issue in a stream is considered to be active if the change package associated with the issue has had one or more of its versions promoted to the stream, but has not yet been promoted from the stream to its parent.
Tip: You can display active issues for an individual stream by choosing Show Active Issues from the context menu for that stream. You can also change the display mode for all streams in the StreamBrowser by clicking the Active Issue Mode button (![]() ) on the StreamBrowser.
) on the StreamBrowser.
Note: The Issues tab will not display any issues if you invoke Show Active Issues on a snapshot, since nothing can be promoted to a snapshot.
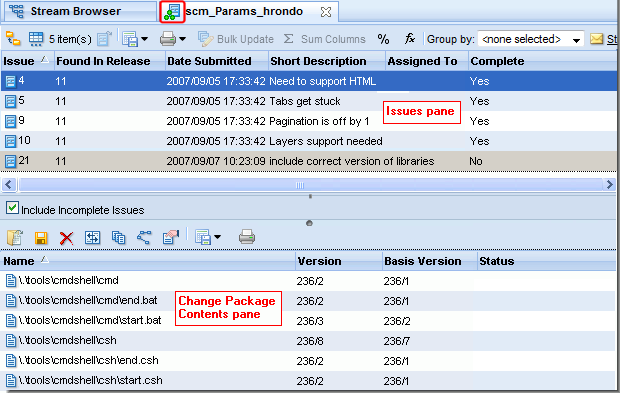
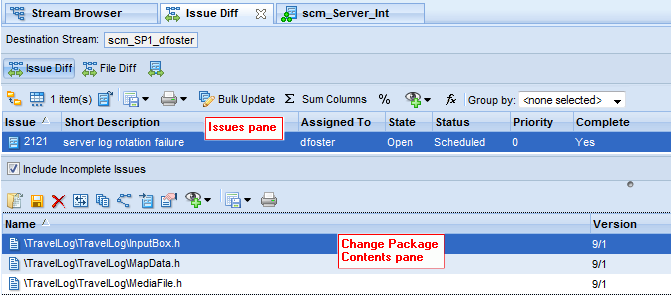
Click an issue in the Issues pane to display the items currently in its change package in the Change Package Contents pane. This pane lists the file name, version, and basis version for each element in the change package.
Entries are included for elements in the change package only if they were promoted to the stream, but have not yet been promoted from the stream to its parent. This helps you to concentrate on current programming efforts, rather than those that were completed long ago.
Note: For the purposes of the display on this tab, a Revert to Backed operation has the same effect as a Promote operation. For a workspace, substitute the phrase "created in" for "promoted to".
Incomplete issues are shown by default and can be excluded by clearing the Include Incomplete Issues checkbox. (An issue is incomplete when some, but not all, of its change package entries are in the stream.) When the checkbox is selected, the Complete column appears and shows the incomplete issues with a grey background in the Issues pane. When an incomplete issue is selected, the missing versions will be shown with a grey background on the Change Package Contents pane. In addition, the Status column on that pane will read (Missing) for each missing version.
Unaffiliated Changes ("Dark Matter")
It is possible to end up with changes that are not associated with any issue. For example, someone might decide that a file does not belong to an issue and remove it from the change package. Or someone might decide to promote a file in a backing stream, without associating it with an issue. Element versions that are not associated with any issue are considered unaffiliated (or "dark matter").
Because such element versions can lead to confusion, AccuRev provides several ways to view unaffiliated changes in the Web UI. You can view unaffiliated changes:
- On the Issues tab (when viewing active issues in a stream; see example)
- On the Issue Diff tab (which appears after diffing two streams)
- On the Diff vs Query tag (which appears after diffing two streams’ issues, and then diffing the result against a query you choose)
Example:
- In the StreamBrowser, change to the Active Issue display mode by clicking the Active Issue Mode button (
 ) in the upper right corner of the StreamBrowser.
 - Click the default group icon on the stream you want to review.
AccuRev displays the Issues tab:
Managing Unaffiliated Changes
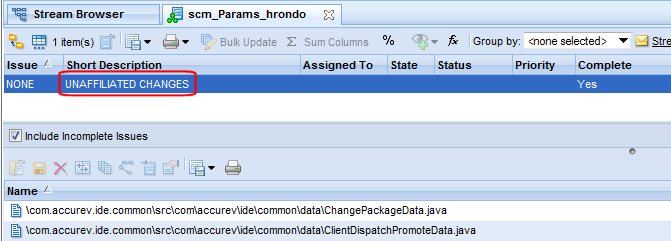
If any unaffiliated changes exist in the stream, the issue table gains an extra row labeled "NONE". (This is true regardless of how you display the issues table.) If your table layout includes a second column (in this example, the column Complete), AccuRev displays "UNAFFILIATED CHANGES" in the row. Clicking anywhere in the row displays the unaffiliated elements. For each unaffiliated element, examine its history to determine how best to manage it—you might decide that you need to promote a file to an issue to correct the problem, for example.
For more information on working with unaffiliated changes, see the topic Patches and Change Packages topic in the Java GUI online help.
Accessing the Active Issues via URL
A link to the Web UI URL (labeled "Stream Active Issues Link") used to access this view is shown at the top of the tab. See URLs for AccuWork Queries and Issues .
Working in the Issues Pane
Select one or more issues to invoke commands on the issues. Commands are available from both the toolbar and context menu unless noted otherwise.
![]() Promote
Promote
This command promote the selected issue so that it is active in the parent stream. This command is available from the context menu only.
![]() Table Filter
Table Filter
Displays a dialog box to enable paging in the issue list (see Query Results Pane). Enter the number of items to display per page. This command is available from the toolbar only.
![]() Open Issue
Open Issue
Opens the selected issue in AccuWork or a third-party issue tracking tool (see Open Issue).
Show Change Package
Shows the change package contents for the selected issue in a separate tab. This command is available from the context menu only.
![]() Export
Export
![]() Print
Print
Allows you to print issue table or issue details reports. See Reports About Issues for more information. This command is available from the toolbar only.
![]() Bulk Update
Bulk Update
Changes field values for the selected issues. See Bulk Update for more information..
![]() Sum Columns
Sum Columns
Returns the number of issues selected, as well as the sums of all Text fields with numeric-only data and the sums of all Timespan fields. See Sum Columns for more information.
![]() Show Percentages
Show Percentages
Displays percentage information for columns that contain numeric data.See Show Percentages for more information. This command is available from the toolbar only.
![]() Code Review
Code Review
If enabled by your AccuRev administrator, allows you to create a code review for the selected file, or add files to an existing code review. See Creating a Crucible Review for AccuRev Elements for more information.
![]() Calculate Columns
Calculate Columns
Allows you to perform basic mathematical operations (add and subtract, for example) on any two columns with numeric values. A new column is created to display the results. See Calculate Columns for more information. This command is available from the toolbar only.
![]() Group By
Group By
See Group Issues by Field. This command is available from the toolbar only.
Working in the Change Package Contents Pane
Select any change package entry to invoke any of the commands described here. In most cases, the operation is performed on the entry's head version (Version column). Commands are available from both the toolbar and context menu unless noted otherwise.
![]() Open
Open
Using the Open Commands the file.
![]() Save As
Save As
Saves the currently selected file to another filename. See Save As.
![]() Remove
Remove
Removes the selected entry or entries from the change package.
Tip: The Delete key on your keyboard also performs the remove action.
![]() Diff Against Basis
Diff Against Basis
Compares the selected version or versions with the corresponding basis version, revealing what changes were made to the file (see Diff Against Basis). If you select multiple files, navigation icons (![]() )appear in the toolbar that allow you to step through the selected files.
)appear in the toolbar that allow you to step through the selected files.
Note: If you receive the error message “Diff action is not available for selected elements”, check to see if any of your selections are either binary files, or have a basis version of “0/0”. These elements cannot be diff’d.
![]() History
History
Opens a History Browser tab, containing the transactions involving the selected file or directory.
![]() Version Browser
Version Browser
Opens the Version Browser, showing the version from the change package in the context of its ancestors (and children, if any).
![]() Send files to Issue
Send files to Issue
Sends the selected files to the change package section (Changes tab) of the issue record you specify.
See Using AccuWork for more information about issues and change packages.
![]() Properties
Properties
Displays a message box with information about the selected element. See Displaying Element Properties.
![]() Export
Export
See Common Table Commands. This command is available from the toolbar only.
![]() Print
Print
Prints the list of files displayed in the Change Package Contents pane. This command is available from the toolbar only.
Diff Against
The Issue Diff tab appears whenever you choose one of the many Diff Against Basis (by Issues) or Issue Diff commands available throughout the Web UI. This tab shows the source and destination streams for the comparison, and a list of issues which differ between the two streams.
Working in the Issues Pane
You can invoke the following commands from the Issue Diff main toolbar:
![]() Issue Diff
Issue Diff
Displays the issues that differ between the source and destination streams.
![]() File Diff
File Diff
Displays the files that differ between the source and destination streams.
![]() Diff vs Query
Diff vs Query
See Diff vs Query
![]() Promote
Promote
This command promote the selected issue so that it is active in the parent stream. This command is available from the context menu only.
![]() Table Filter
Table Filter
Displays a dialog box to enable paging in the issue list (see Query Results Pane). Enter the number of items to display per page. This command is available from the toolbar only.
![]() Open Issue
Open Issue
Opens the selected issue in AccuWork or a third-party issue tracking tool (see Open Issue).
Show Change Package
Shows the change package contents for the selected issue in a separate tab. This command is available from the context menu only.
![]() Export
Export
![]() Print
Print
Allows you to print issue table or issue details reports. See Reports About Issues for more information. This command is available from the toolbar only.
![]() Bulk Update
Bulk Update
Changes field values for the selected issues. See Bulk Update for more information.
![]() Sum Columns
Sum Columns
Returns the number of issues selected, as well as the sums of all Text fields with numeric-only data and the sums of all Timespan fields. See Sum Columns for more information.
![]() Show Percentages
Show Percentages
Displays percentage information for columns that contain numeric data. See Show Percentages for more information. This command is available from the toolbar only.
![]() Code Review
Code Review
If enabled by your AccuRev administrator, allows you to create a code review for the selected file, or add files to an existing code review. See Creating a Crucible Review for AccuRev Elements for more information.
![]() Calculate Columns
Calculate Columns
Allows you to perform basic mathematical operations (add and subtract, for example) on any two columns with numeric values. A new column is created to display the results. See Calculate Columns for more information. This command is available from the toolbar only.
 Group By
See Group Issues by Field. This command is available from the toolbar only.
![]() Include Incomplete Issues
Include Incomplete Issues
Incomplete issues are shown by default and can be excluded by clearing the Include Incomplete Issues checkbox. (An issue is incomplete when some, but not all, of its change package entries are in the stream.)
Working in the Change Package Contents Pane
Select any change package entry to invoke any of the commands described here. In most cases, the operation is performed on the entry's head version (Version column). Commands are available from both the toolbar and context menu unless noted otherwise.
![]() Open
Open
Using the Open Commands the file.
![]() Save As
Save As
Saves the currently selected file to another filename. See Save As.
![]() Remove
Remove
Removes the selected entry or entries from the change package.
Tip: The Delete key on your keyboard also performs the remove action.
![]() Diff Against Basis
Diff Against Basis
Compares the selected version or versions with the corresponding basis version, revealing what changes were made to the file (see Diff Against Basis). If you select multiple files, navigation icons (![]() )appear in the toolbar that allow you to step through the selected files.
)appear in the toolbar that allow you to step through the selected files.
Note: If you receive the error message “Diff action is not available for selected elements”, check to see if any of your selections are either binary files, or have a basis version of “0/0”. These elements cannot be diff’d.
![]() History
History
Opens a History Browser tab, containing the transactions involving the selected file or directory.
![]() Version Browser
Version Browser
Opens the Version Browser, showing the version from the change package in the context of its ancestors (and children, if any).
![]() Send files to Issue
Send files to Issue
Sends the selected files to the change package section (Changes tab) of the issue record you specify.
See Using AccuWork for more information about issues and change packages.
![]() Properties
Properties
Displays a message box with information about the selected element. See Displaying Element Properties.
![]() Code Review
Code Review
If enabled by your AccuRev administrator, allows you to create a code review for the selected file, or add files to an existing code review. See Creating a Crucible Review for AccuRev Elements for more information.
![]() Export
Export
See Common Table Commands. This command is available from the toolbar only.
![]() Print
Print
Prints the list of files displayed in the Change Package Contents pane. This command is available from the toolbar only.
This feature is available from the Issue Diff tab, and allows you to compare the results of the current Issue Diff operation against the results of an issue query. Diff vs Query is useful as an auditing tool, allowing you to verify that the issues that you think are being worked on are those actually being worked on. Make sure that you have a valid issue query defined that can be used with this feature. (See New Query Tab.)
The results of the comparison are displayed on the Diff vs Query tab, with the Query and the Source Stream displayed at the top. Symbols in the Diff column indicate whether an issue was returned by the query (![]() ), is present in the source stream (
), is present in the source stream (![]() ), or both, as shown in the following illustration:
), or both, as shown in the following illustration:
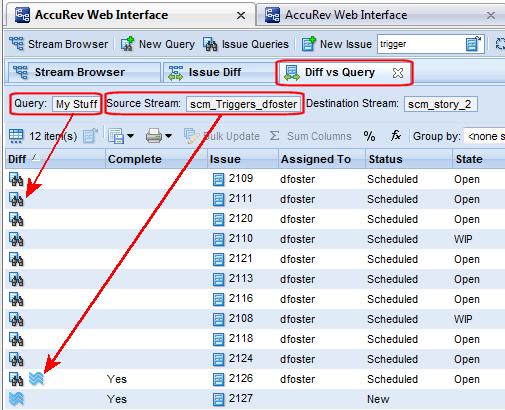
The Complete column indicates whether or not an issue in a stream is complete. (An issue is incomplete when some, but not all, of its change package entries are in the stream.) A value of Yes means the issue is complete; No means the issue is incomplete. If an issue appears only as the result of the query, that is, the issue is not in the source stream, the Complete column is empty.
See Query Diff to learn how to compare the results of two queries.
To perform a Diff vs. Query operation:
- In the StreamBrowser, change the display Active Issues Mode (
 ).
). -
Perform an Issue Diff operation against two streams.
See Issue Diff if you need help with this step.
-
In the Issue Diff tab, click the Diff vs Query button (
 ).
).The Query Selection dialog box appears.
- Select the query whose results you want to compare with the results of the Issue Diff operation, and click Ok.
The results are displayed in the Diff vs Query view described earlier in this section.


