
Share this page


Issue Edit Form
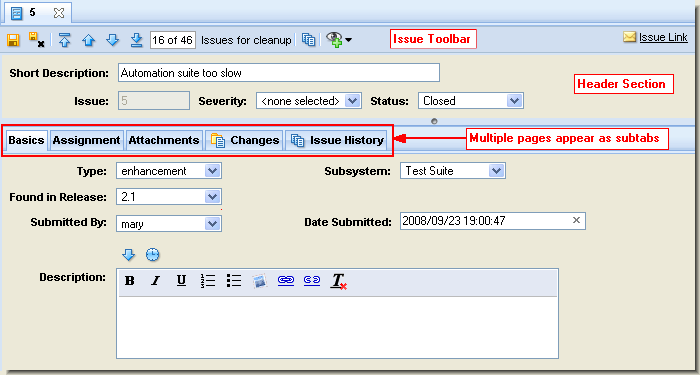
You use the Issue Edit form to create, view, and edit an issue record in an AccuWork issue database.
Note: The contents and layout of the Issue Edit form is based on the schema of the associated AccuWork issue database. Because each depot can be associated with a different AccuWork issue database, the look and feel of the Issue Edit form might change depending on the depot you are querying. Issue Edit forms and the AccuWork issue database are defined using the Schema Editor in the AccuRev Java GUI.
In addition, the toolbar can display additional buttons for workflow features. See Changes to the Issue Edit Form for more information.
Opening the Issue Edit Form
Use any of the following procedures to open the Issue Edit form:
- Click the
 New Issue button in the Web UI main toolbar and choose a depot.
 - Click the Searching for Issues field in the Web UI toolbar and enter an issue number.
-
For an individual issue:
- Double-click the issue
- Right-click the issue and choose Open Issue from the context menu.

Features
All Issue Edit forms have these features in common:
- The Issue Edit form consists of one or more pages, which appear as subtabs within the overall issue tab. Examples of subtabs in the preceding illustration include Basics, Assignment, and Changes.
-
Every Issue Edit form has these two subtabs:
- The Changes Subtab displays the issue record's change package, and provides commands for analyzing and manipulating the change package's entries. To see the change package in a separate tab, click the
 Change Package History button on the Issue Toolbar. See Change Package History Tab for more information.
 - The Issue History Subtab displays details of how the issue record's field values have changed over time.
- The Changes Subtab displays the issue record's change package, and provides commands for analyzing and manipulating the change package's entries. To see the change package in a separate tab, click the
- Typically, there is a header section, which always remains visible as you switch from page to page.
- Each field in the issue database is shown with a descriptive text label to its left. By default, a label in red text indicates a required field.
- Every Issue Edit form contains a toolbar with issue-related commands. See Working in an Edit Form Tab for more information.
Working in an Edit Form Tab
This section describes some of the features supported by AccuWork in the Issue Edit form. Note that the types of fields you see in an Issue Edit form and their behavior (whether or not they are required or are initialized, for example) is determined by how the form was defined in the AccuRev Schema Editor. See Understanding Issue Form Validation for more information.
Saving or Discarding Your Work
Your changes to an issue in the Issue Edit form are not saved until you click the Save (![]() ) or
) or
Save and Close (![]() ) button in the tab's toolbar. When you save an issue record, the issue record is stored in the depot's issue database, within the AccuRev repository. For new issues, AccuWork assigns the next available integer issue number to the new issue record when you save your work. This number cannot be modified.
) button in the tab's toolbar. When you save an issue record, the issue record is stored in the depot's issue database, within the AccuRev repository. For new issues, AccuWork assigns the next available integer issue number to the new issue record when you save your work. This number cannot be modified.
A transaction of type dispatch records the modification to the issue record. You can see the record of changes to a record on the Issue History Subtab.
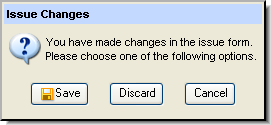
If you attempt to close the Issue Edit form without saving, the AccuRev prompts you to save your changes. If you do not want to save your work, click Close.

You are also prompted to save if you attempt to navigate away from a changed issue. See Navigating Among Issues for more information.
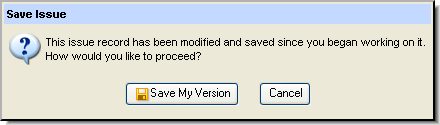
Conflicting Changes
If the issue you are working on has been edited and saved by another user during the time you are making changes, AccuRev notifies you when you attempt to save.
The Issue toolbar contains a set of controls used to navigate among issues returned by a query, or across the depot:
- If you open an issue from the Query Results Pane or other list of issues, these buttons navigate among issues in the list; the query name is displayed on the Issue toolbar.
- If you open an issue using the Issue Search command, these buttons navigate among all issues in the database.
![]() First Issue
First Issue
Display the first issue from the query results. This icon is disabled unless you are accessing query results.
![]() Previous Issue
Previous Issue
Display the previous issue.
![]() Next Issue
Next Issue
Display the next issue.
![]() Last Issue
Last Issue
Display the last issue from the query results. This icon is disabled unless you are accessing query results.
The field to the right of the navigation controls (![]() ) shows which issue in the set is currently displayed, and the total of all issues in the set being navigated.
) shows which issue in the set is currently displayed, and the total of all issues in the set being navigated.
If you navigate away from an issue using these controls after having made changes to it, the Web UI will prompt you to save your changes.
Creating URLs for Individual Issues
“Mailto” and Issue Link (![]() ) buttons are displayed at the top of each Issue Edit form, allowing you to provide other AccuRev users with access to individual issues. See Obtaining Web UI Links.
) buttons are displayed at the top of each Issue Edit form, allowing you to provide other AccuRev users with access to individual issues. See Obtaining Web UI Links.
Printing Issue Reports
You can print a detailed report about the current issue displayed in the Issue Edit form, including data on its subtabs. See Reports About Issues for more information.
Understanding Issue Form Validation
Issue Form field definitions—whether or not a field is required, how it is initialized, valid values, and so on—are specified using the AccuRev Schema Editor in the AccuRev Java GUI. As you work in an Issue Edit form, you may notice these effects:
- A new issue has values automatically filled in for certain fields.
- One or more field have automatically been set to a specified value.
- The set of choices available in a list has changed.
-
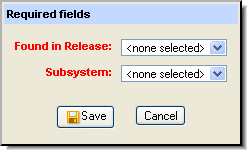
The set of required fields has changed. If a field's label appears in red, it is a required field. You cannot Save the issue record until every required field has a value (that is, is not empty or in the case of lists, is set to a value other than <none selected>). Some required fields may have values set through an automated field initialization.
If you attempt to save the issue record when one or more required fields lack a value, AccuRev displays a dialog box containing a list of the required fields. You must specify a value for all required fields before you can save the issue record.
- The Changes tab has become required. This validation option prevents an issue from being saved unless there are versions associated with the issue.
- One or more fields, tabs, or issues are read-only.
- Setting a field to a certain value requires a type of relationship to another issue. For example, setting State to Duplicate requires that you identify the issue that this one is a duplicate of.
Working with Text and Log Fields
Fields with a data type of Text and Log on the Issue Edit form can have multiple lines, as well as a default height and width. These dimensions are set when the field and the form are designed in the AccuRev Schema Editor. The Web UI displays a scroll bar on text and log fields when the content exceeds the available display. A toggle button (![]() ) allows you to quickly expand the field; click it again to collapse the field.
) allows you to quickly expand the field; click it again to collapse the field.
Rich text can also be enabled for these fields, provided that they are defined with a height of two or more lines, as shown in the following illustration:

The rich text formatting toolbar allows you to:
- Bold, italicize, and underline text
- Create numbered and bulleted lists
- Add images
- Create and remove links
- Undo formatting
Rich text is typically enabled by the AccuRev administrator. See AccuWork in the AccuRev On-Line Help Guide for more information.
If a field has been defined with a Log datatype in the AccuRev Schema Editor, the Web UI displays the Add Timestamped Text button (![]() ). Clicking this button adds a timestamp to the top of the field. The timestamp format is AccuRev username, day, date, time, time zone, and year, as shown in the following example:
). Clicking this button adds a timestamp to the top of the field. The timestamp format is AccuRev username, day, date, time, time zone, and year, as shown in the following example:
[dfoster, Wed Sep 08 10:34:36 GMT-400 2010]
Working with User Fields
Note that when working with fields containing lists of AccuRev users on an issue form, only active users are typically displayed. Occasionally, a user who has been deactivated in AccuRev is still associated with an issue (as the submitter of the issue, for example). In this case, the user's name is added to the list of users displayed in user fields for that issue.
Working with Date Fields
Date fields in AccuWork issues have an associated date/time control to assist in filling in the field. Click in the field to display the date/time control. This control defaults to the current date and time. Use the navigation arrows (<< and >>) to pick a different month.
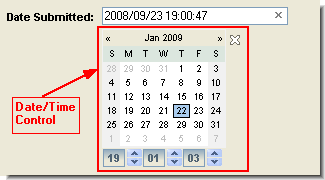
Click a day or adjust the time to put the date and time in the field. To close the control, use the click-to-close icon (![]() ). To clear an existing value from the date field, click the Clear button on the right side of the field.
). To clear an existing value from the date field, click the Clear button on the right side of the field.

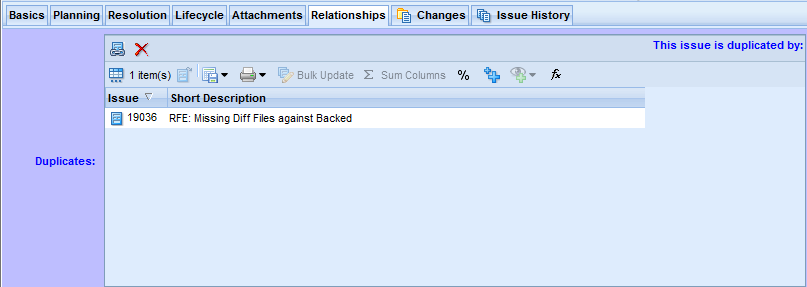
Relationships Subtab
AccuRev supports four types of relationships that can be used to link issues: dependencies, duplicates, subtasks, and tracking issues. Each relationship type has its own section on the Relationships subtab, like the Duplicates section shown here:
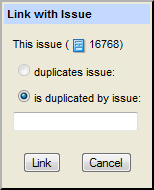
![]() Link issue
Link issue
Adds a link to an existing issue. AccuRev displays a dialog box that lets you choose the relationship type and enter the issue number of the issue you are linking to the current issue.
![]() Remove link
Remove link
Use the Remove link command to remove the relationship between the current issue and the selected link. This command is not available before the issue has been saved.
Tip: The Delete key on your keyboard also performs the delete action.
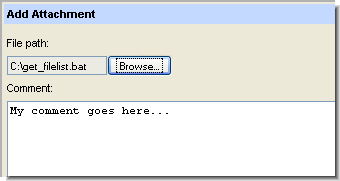
Attachments Subtab
An attachment field allows you to attach one or more files and/or Internet resource (URLs) to the current issue record. AccuWork displays the attachments data as a table.

In addition to specifying the location of a file or Internet resource, you enter an optional comment. AccuWork automatically fills in your username, the date, and the size of the attached file. (URLs are assigned a size of 0.)
An attachment field has its own toolbar, with these buttons:
![]() New Attachment
New Attachment
Defines a new file attachment for this issue record. An Add Attachment dialog box appears, in which you can specify a file to attach and, optionally, a comment string.
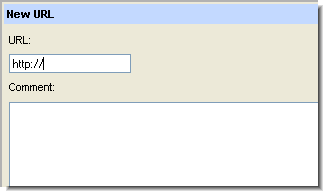
![]() New URL
New URL
Defines a new attachment to be the address (URL) of an Internet resource. A New URL dialog box appears, in which you specify a URL and, optionally, a comment string. AccuWork automatically inserts http:// in the URL field. You can replace this with another Internet protocol if necessary.
 Open Attachment
Opens the selected attachment. Opening a file uses the browser's file type associations to open the file using the correct program. If the file cannot be opened within the browser, you are prompted to open the file using an external program, or save the file to disk.
![]() Save Attachment As
Save Attachment As
Creates a copy of the selected file attachment on the client machine. URL attachments cannot be saved in this way.
![]() Delete Attachment
Delete Attachment
Deletes the attachment from the issue record (and from the depot). A URL attachment can be deleted at any time. A newly added file attachment can be deleted if you have not yet saved the issue record.
Tip: The Delete key on your keyboard also performs the delete action.
When you save the issue record, each file is copied to the depot, so that the data always remains available through the issue record, even if an original file is deleted.
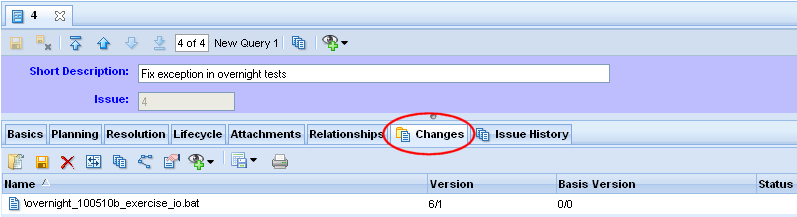
Changes Subtab
The Changes subtab of an issue record's edit form shows the change package of the issue record. You can invoke commands to see the details of the change package's changes, maintain its entries, and view the transaction and version history of its elements.
Changes Subtab Layout
The Changes subtab contains a table; each row displays information about one change package entry. A given element can have at most one entry in a change package—but this entry can grow over time, as development work continues on the element.
The change package table includes these columns:
Name
The element's path name within the depot.
Version
The head version of the change package entry.
Basis Version
The basis version of the change package entry.
The head version and basis version are the "endpoints" of the change package entry. That is, the entry consists of all the versions between these two versions. (The head version is included; the basis version isn't.)
The following commands are available for items in the Changes subtab. Commands are available from both the toolbar and context menu unless noted otherwise.
![]() Open
Open
Opens the file.
![]() Save As
Save As
Saves the currently selected file to another filename. See Save As for more information.
![]() Remove
Remove
Removes the selected entry or entries from the change package. This change takes effect immediately—you cannot discard the change by closing the tab without invoking the Save command.
Tip: The Delete key on your keyboard also performs the remove action.
![]() Diff Against Basis
Diff Against Basis
Compares the selected version with the corresponding basis version, revealing what changes were made to the file. Note that comparisons do not work on binary files. Diff Against Backed or Basis Version for more information.
![]() History
History
Opens a History Browser tab, which contains the transactions involving the selected element.
![]() Properties
Properties
Displays a message box with information about the selected element. See Displaying Element Properties for more information.
![]() Code Review
Code Review
If enabled by your AccuRev administrator, allows you to create a code review for the selected file, or add files to an existing code review. See Creating a Crucible Review for AccuRev Elements for more information.
![]() Export
Export
![]() Print
Print
Prints the list of files displayed in the Changes subtab.
Issue History Subtab
The Issue History subtab of the Issue Edit form shows, on a field-by-field basis, how the issue record has changed over time. Each row corresponds to a field in the issue record.
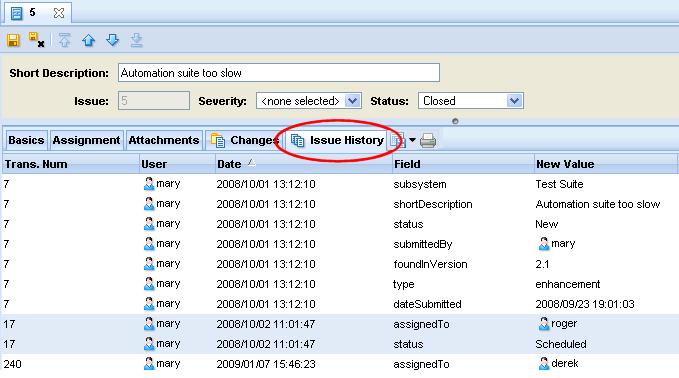
The Issue History table contains these columns:
TransNum
The number of the Save transaction. (The transaction type is dispatch.)
User
The user who made the change to the issue record.
Date
The time at which the change took place.
Field
The field whose value changed (or was initially created).
New Value
The value to which this transaction changed this field.
Old Value
The value of this field prior to the Save. (Empty for the issue record's initial Save transaction.)
Working in the Issue History Subtab
The following commands are available for items in the Issue History subtab. Commands are available from both the toolbar and context menu unless noted otherwise.
![]() Export
Export
![]() Print
Print
Prints the list of transactions displayed in the Issue History subtab.
Change Package History Tab
The Change Package History tab displays the transactions that are part of the current issue's change package. Transactions are displayed in the transactions pane. The change package —all the items associated with a specific transaction—are displayed in the change package contents pane when you select a transaction in the transaction pane. The change package contents pane displays the file name, version, basis version, and status for each element in the change package.

To display the Change Package History tab:
- Open the Issue Edit form.
- Click the Change Package History button ().
Working in the Change Package Contents Pane
Select any change package entry and invoke any of the commands described below via its context menu. In most cases, the operation is performed on the entry's head version (Version column).
![]() Open
Open
Opens the file.
![]() Save As
Save As
Saves the currently selected file to another filename. See Save As for more information.
![]() Remove
Remove
This command is not available from the Change Package History tab.
![]() Diff Against Basis
Diff Against Basis
Compares the selected version with the corresponding basis version, revealing what changes were made to the file. Note that comparisons do not work on binary files. See Diff Against Backed or Basis Version for more information.
![]() History
History
Opens a History Browser tab, containing the transactions involving the selected file or directory.
![]() Version Browser
Version Browser
Opens the Version Browser, showing the version from the change package in the context of its ancestors and children, if any.
![]() Properties
Properties
Displays a message box with information about the selected element. See Displaying Element Properties for more information.
![]() Code Review
Code Review
If enabled by your AccuRev administrator, allows you to create a code review for the selected file, or add files to an existing code review. See Creating a Crucible Review for AccuRev Elements for more information.
![]() Export
Export
![]() Print
Print
Prints the list of files displayed in the change package contents pane.


