SV Lab Concepts And Architecture Overview
Watch a video explaining motivation and basic concepts of SV Lab:
SV Lab is an environment virtualization toolkit that complements Service Virtualization in areas that would be otherwise difficult to handle using virtual services based on the standard data model.
SV Lab is especially useful when your automated or manual tests need to follow series of steps in predefined test case scenarios. In this case, SV Lab is designed to support even very complex test scenarios that involve several cooperating services which can behave differently in different phases of your test.
Imagine you are developer, QA engineer, or architect trying to put together an automated integration test involving multiple micro services in a way that is not straightforward. Also imagine that some of the components are not yet developed or stable, maybe even all of them in a case where you chose to design the test up front. Making the components replaceable with their simulated virtual counterparts, enables you to start testing the system virtually as soon as the development phase begins. It will make it clear to everyone how the components should interact. It will also reduce the time wasted by waiting for other people and teams. If you are working in the world of IoT, you may also benefit greatly by removing dependencies on physical devices that may be exceedingly complex, expensive, or far away.
Service virtualization
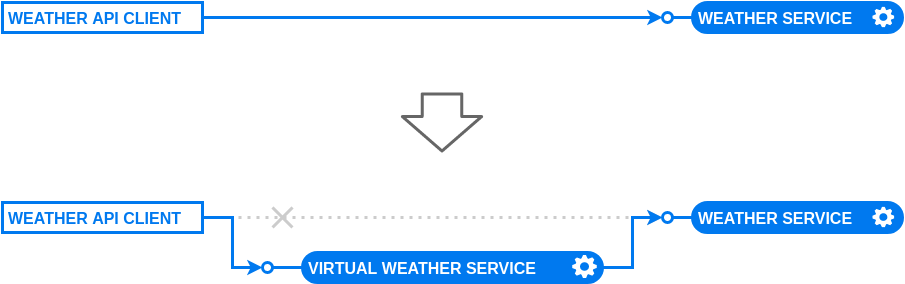
The key idea of service virtualization is to replace a real service with its virtual counterpart, known as a virtual service. The clients consuming the service are reconfigured to use the virtual service instead of the real one.
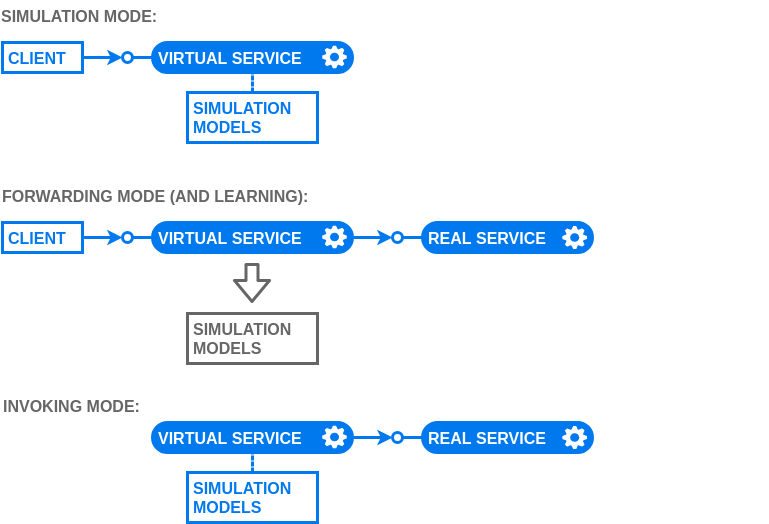
Once the traffic is directed through the virtual service, the virtual service mode determines what will happen with the requests. The virtual service can either respond back during simulation, or forward the message to a real service (when learning). It can even generate requests to a real service simulating client behavior in the invocation mode.
| Mode | What happens |
|---|---|
| Simulation mode | The client submits the request to a virtual service, and the virtual service responds during the simulation. |
| Forwarding mode (and learning) | The client submits the request to a virtual service, and the virtual service forwards the request to a real service for learning. |
| Invocation mode | The virtual service generates requests for a real service, simulating client behavior derived from a simulation model. |
The manner in which the SV Lab hooks between the client and real service depends on the technology used by the virtualized service. The following sections illustrate three of the most common protocols: REST, SOAP and MQTT services.
REST service virtualization
The simplest way to configure REST service clients to use a virtual service is to modify their proxy settings.
The following example illustrates the process on a simple application used in the smart-irrigation-maven demo bundled with SV Lab. The IrrigationLogic component of the application calculates the amount of water required by plants, based on the weather forecast provided by the Weather Forecast Service.

The REST client is configured to use the HTTP proxy connector
inside running SV Lab as a HTTP proxy. Since it is a Java application using
plain HTTP protocol (not HTTPS), we use the http.proxy.host and
http.proxy.port Java properties to set the proxy configuration.

All the client requests pass through the HTTP proxy connector. The proxy
connector directs requests to virtualized endpoint
http://www.medard-online.cz/ to a virtual service, leaving requests to
other endpoints untouched.
SOAP service virtualization
Similarly to REST, you should modify HTTP proxy settings of SOAP service clients to use a virtual service.
Another possibility is to use an HTTP Gateway connector and modify hostname and port the service client uses to communicate with the service.
MQTT service virtualization
The idea behind MQTT protocol virtualization is best illustrated on the mqtt-sensors demo bundled with SV Lab distribution. With MQTT, there are publishers publishing messages to topics and subscribers consuming messages from topics.
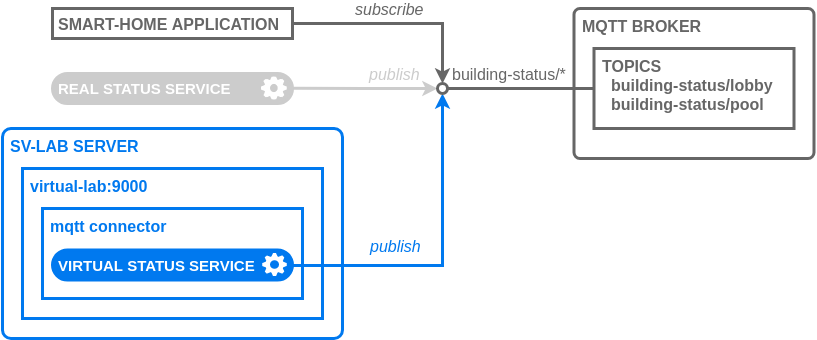
The virtual service can publish messages to chosen topic(s) in the invocation
mode or subscribe to one or more topics with pattern like building-status/*
and consume messages from other publishers in the simulation mode.
Basic SV Lab concepts
This section describes several basic SV Lab building blocks using the hello-world demo available on GitHub.
Service Model
The behavior of the service is described by service model defined in the
src/main/resources/demo/HelloServiceModel.js file. It uses a
domain-specific language based on ECMAScript 6.
For details, see Virtualization and Simulation Language (VSL).
All the VSL related language constructs are imported from the lib/sv-vsl.js
file:
import * as sv from "../../../../../lib/sv-vsl.js"Every service model extends the ServiceModel class:
export class HelloServiceModel extends sv.ServiceModel {
    ...
The service is passed as a constructor parameter and stored for further use
in scenarios. The service type can be either a custom service interface or
a generic RestServiceInterface one as seen below. For example:
constructor(service: sv.RestServiceInterface) {
    super(service);
    this.service = service;
}
Service Scenario
Each behavior that a service can simulate is described in a service scenario.
A scenario is a method marked with the @scenario annotation:
@sv.scenario
simpleSayHello() {
...
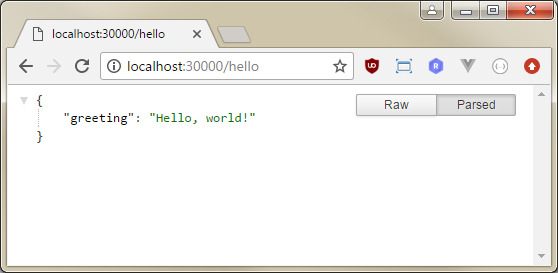
}Each scenario contains a sequence of service calls describing the request and response:
this.service.GET("/hello")
    .withRequest()
    .withResponse({greeting : "Hello, world!"}, sv.JSON)    // first response
        .withHeaders({"Content-Type": "application/json"})
        .withStatusCode(200);

this.service.GET("/hello")
    .withRequest()
    .withResponse({greeting : "Hello again!"}, sv.JSON)     // second response
        .withHeaders({"Content-Type": "application/json"})
        .withStatusCode(200);
Each time the scenario is simulated, it expects a HTTP GET request. It returns
the first JSON response. Then it expects a similar request and returns the
second response, Hello again!.
Note
Sometimes a request to an unknown resource /favicon.ico is reported during
the simulation to the console and log. This is normal, since you are
accessing the service with a web browser, which tries to fetch the
resource when you open a new web
page. For the sake of simplicity, the call was omitted from the example
service model.
Stateless simulation fallback
When the simulator does not match the expected message (due to a mismatch in the request parameters, headers, or body), it falls back to the stateless simulation strategy and responds with the first message from the scenario.
For more information on simulation algorithm, see Simulation.
Application Model
The SV Lab can simulate multiple virtual services in parallel, behaving differently in each of the test cases. Each test case is defined by an application scenario which runs when the test is initiated.
The following example defines the sayHello application scenario using a
single service:
@sv.applicationScenario
sayHello() {
    this.smHelloServiceModel.simpleSayHello();
}
It is then launched from Java:
sv.runSimulation("sayHello");Virtual Lab
In order to run and use the simulation, you configure and start a virtual lab. The virtual lab can be configured using a JSON file or it can be set up and controlled through the SV API.
The following example loads the lab configuration from the
src/main/resources/sv-lab.json file and compiles the module from the
application and service model sources (HelloApplicationModel.js and
HelloServiceModel.js):
final String labConfigPath = "classpath:/sv-lab.json";
final String vslPath = "classpath:/demo/*";
sv.loadActiveVirtualLab(labConfigPath, sv.compileModuleFromSources(vslPath), true);
We recommend that you keep the VSL sources and sv-lab.json file in the
resources directory of your testing project and access them with
"classpath:/..." Spring resource locators.
Alternatively, use the relative ("file:target/classes/sv-lab.json") or even
absolute ("file:///c:/test/Lab/demo/hello-world/target/classes/sv-lab.json")
path to locate the files.
The configuration file defines the virtual lab in which to run all the services, and the application model to use:
"virtualLab": [
  {
    "id": "virtual-lab:9000",
    "displayName": "Hello Lab",
    "applicationModelId": "HelloApplicationModel",
    "connector": ...,
    "virtualServiceInstance": ...
  }
]
The following code creates an HTTP connector which provides connectivity for the REST virtual service to simulate:
"connector": [
  {
    "id": "connector",
    "connectorType": "httpGateway",
    "properties": {
      "bindPort": 9000
    }
  }
]
The following code creates a service instance specifying the virtual endpoint
path where it will be exposed, and chooses the SIMULATE_SERVICE simulation
mode.
"virtualServiceInstance": [
  {
    "virtualServiceId": "HelloServiceModel.RestServiceInterface",
    "serviceMode": "SIMULATE_SERVICE",
    "endpoints": [
      {
        "properties": {
          "httpVirtualPath": "/"
        },
        "connectorId": "connector"
      }
    ]
  }
]
After all of the above configurations, we start the virtual lab and the sayHello scenario from Java.
sv.startActiveVirtualLab();
sv.runSimulation("sayHello");