Share this page


Planning Support for the ImageButton Control
In this section, you analyze the current OpenText Functional Testing support of the ImageButton control, determine the answers to the questions in the How to Use the Planning Checklist, and fill in the Custom Class Support Planning Checklist , accordingly.
The best way to do this is to run the application containing the custom control, and analyze it from an OpenText Functional Testing perspective using the Object Spy, Keyword View, and Record option.
Run the SampleApp application and open OpenText Functional Testing.
In the Eclipse Package Explorer tab, right-click SampleApp. Select Run As > Java Application. The SampleApp application opens.
Open OpenText Functional Testing and load the Java Add-in.
Use the Object Spy to view the ImageButton properties.
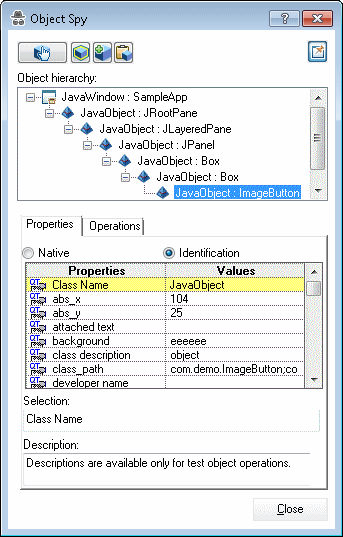
In OpenText Functional Testing, open a GUI test and select Tools > Object Spy or click the Object Spy toolbar button
 to open the Object Spy dialog box. Click the Properties tab.
 In the Object Spy dialog box, click the pointing hand
 , then click the button in the SampleApp application.
The ImageButton control is based on a custom class that OpenText Functional Testing does not recognize. Therefore, it recognizes the button as a generic JavaObject named ImageButton, and the icon shown is the standard JavaObject class icon.
Close the Object Spy.
Record an operation on the ImageButton control.
In OpenText Functional Testing select Record > Record and Run Settings to open the Record and Run Settings dialog box. In the Java tab, select Record and run test on any open Java application. If the Web Add-in is also loaded, click the Web tab and select Record and run test on any open browser. Click OK.
Click the Record button or select Record > Record. Click the button in the SampleApp application. The counter value in the edit box increases by one.
A new step is added to the test.

Click the Stop button or select Record > Stop to end the recording session.
The Click operation recorded on the ImageButton JavaObject is a generic click, with arguments indicating the low-level recording details (x and y coordinates and the mouse button that performed the click).
Determine the custom toolkit to which the ImageButton control belongs.
When you extend support for a control you always do so in the context of a toolkit. For the purpose of this tutorial, three classes that share the same ancestor, java.awt.Canvas, are grouped to form the custom toolkit named ImageControls: ImageButton, ImageLabel, and their superclass ImageControl.
In this lesson you create support for the ImageControls toolkit, initially supporting only the ImageButton class.
Complete the custom class support planning checklist.
You want the ImageButton to be treated as a special kind of button and you want it to support the operation it performs. Therefore it makes sense to create Extensibility support for this control.
The custom class ImageButton extends another custom class, ImageControl, which is also not supported. At this point, there does not seem to be any functionality requiring special support, which ImageButton shares with other classes that extend ImageControl. Therefore it is sufficient to extend support directly to the ImageButton class.
When fully supported, the ImageButton control should be recognized as a JavaButton test object. You want JavaButton test objects representing controls of this type to be named according to the name of the image file that the control displays.
The custom support should also include support for the simple Click-on-the-button operation. (Note that in OpenText Functional Testing, the simple JavaButton Click operation has an optional argument that specifies which mouse button performed the click.) The ImageButton custom class listens for low-level mouse events and substitutes them with events that are more relevant to button behavior, in this case an Action event. Therefore, to record mouse clicks, the support class must listen for Action events.
You can see the checklist, completed based on the information above.
 Next steps: