Creating the New Custom Support Class
In this section you create a custom support class for the AllLights control, as part of the Javaboutique toolkit support. To do this, you use one of the wizards provided by the Java Add-in Extensibility plug-in in Eclipse. The details you specify in each wizard screen reflect the decisions you made when planning the custom support. In the subsequent sections you implement the methods that the wizard creates in this class.
Create a custom support class
Note: The following sections describe only the options in the wizard screens that are relevant to this lesson. For a complete description of all options available in the wizard screens, see Using the Java Add-in Extensibility Eclipse Plug-In.
Open the New UFT Custom Support Class wizard.
In the Eclipse Package Explorer tab, select the new Java Add-in Extensibility project, JavaboutiqueSupport. Select File > New > Other. The New dialog box opens.
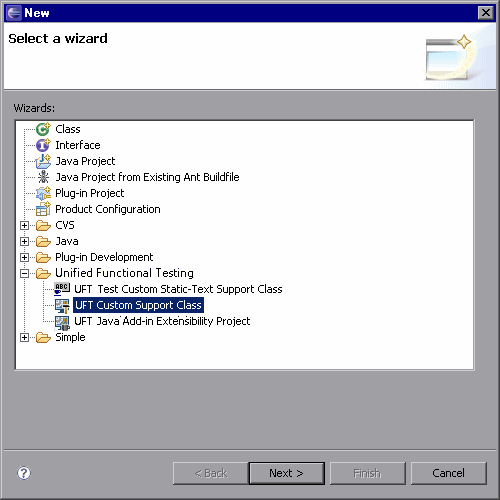
Expand the Unified Functional Testing folder and select UFT Custom Support Class.
Click Next. The Custom Class Selection screen opens.
Select the custom class to support, and set the options for the support class.
Select the AllLights class in the org.boutique.toolkit package.
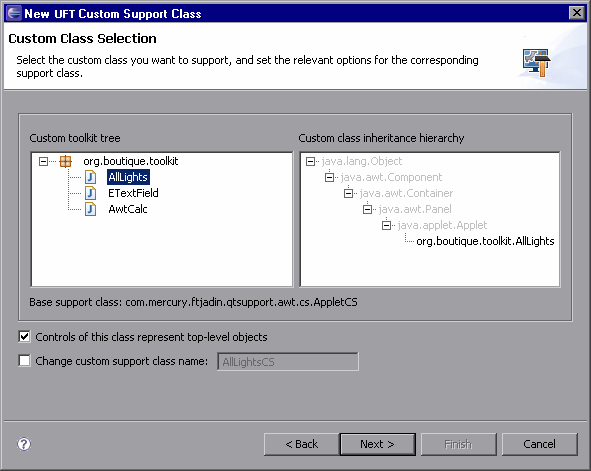
The AllLights custom class extends java.applet.Applet, which is supported on OpenText Functional Testing. The AllLights support class therefore extends the Base support class: com.mercury.ftjadin.qtsupport.awt.cs.AppletCS. As a result, the Controls of this class represent top-level objects check box is selected by default.
Leave this check box selected, because you want the AllLights control to be recognized as the highest Java test objects in the test object hierarchy.
Keep the default custom support class name: AllLightsCS.
Click Next. The Test Object Selection screen opens.
Select a test object class to represent the custom control.
In this screen, you map the custom control to a test object class. In GUI tests, the custom class controls are represented by test objects of this test object class.
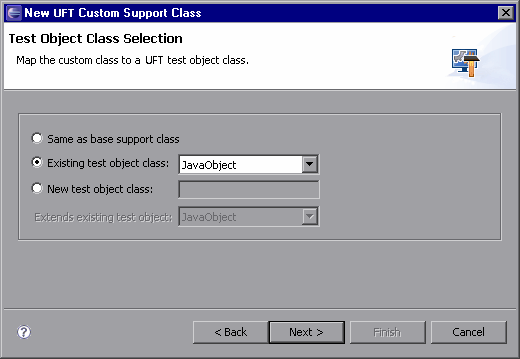
In Planning Support for the AllLights Control, you decided to map the AllLights custom control to a new test object class, AllLights, that extends JavaApplet.
Select the New test object class option and enter AllLights as the name for the test object class.
In the Extends existing test object list, select JavaApplet. This list contains all of the currently supported Java objects. If you define new test objects for custom support, they are included in the list as well.
Click Next. The Custom Support Test Object Identification Properties screen opens.
Determine the set of test object identification properties to implement in AllLightsCS.
This screen displays the identification properties supported by the base support class you are extending, as well as additional properties that are defined in the test object class you selected, but are not yet supported. It enables you to select properties whose support you want to implement or override with new functionality and to add new properties.
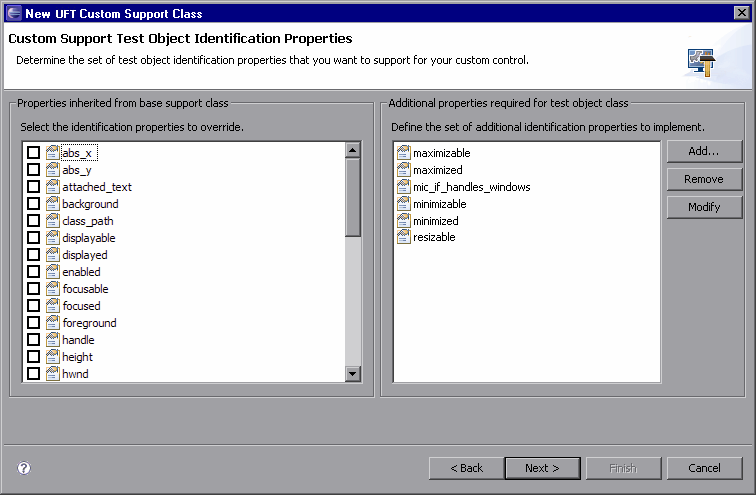
The left pane shows all of the identification properties whose support is implemented by AppletCS, and therefore inherited by the new AllLightsCS support class. For most of the properties in this list, the default implementation is sufficient.
Select the label check box. After you finish generating the support files using the wizard, you override the existing support for this property with a custom implementation that matches the needs of your custom control.
The identification properties displayed in the right pane are JavaApplet properties that are not supported by AppletCS. These properties are not required for the AllLights support. Select them, click Remove, and then click Yes to confirm.
These identification properties are part of the AllLights test object class definition that is created based on the JavaApplet test object class. Removing the properties from this list means that they are not supported for AllLights controls. They still appear in the list of identification properties shown in the OpenText Functional Testing Object Spy, but they will have no value.
In Planning Support for the AllLights Control, you decided to support new identification properties on AllLights test objects. In the next step you add these properties to the list of additional properties required for the test object class. After you finish generating the support files using the wizard, you implement support for these properties.
The identification properties are added to the test object class definition. This means that the new properties appear in the list of identification properties in OpenText Functional Testing for all test objects of this class. This is the reason you are creating the new AllLights test object class.
Add the new test object identification properties you want to implement in AllLightsCS.
Click Add in the Additional properties required for test object class pane. The Identification Property dialog box opens.
In the Name box, enter OnCount. Click OK to add the new Identification Property to the list.
Repeat this procedure to add the properties OnList and GameOver.
Click Next. The Custom Support Test Object Methods screen opens.
Determine the set of test object methods to implement in AllLightsCS.
This screen displays the test object methods defined in the test object class you selected. It enables you to select methods whose support you want to implement or override with new functionality, and to add new methods.
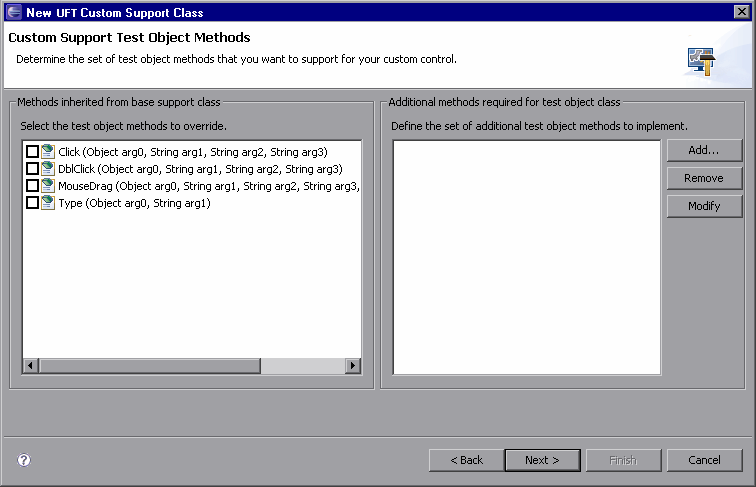
The left pane shows all of the test object methods (defined in the test object class you selected) whose support is implemented by AppletCS, and therefore inherited by AllLightsCS. There is no need to select any methods to override.
The right pane displays the test object methods that are defined for the AllLights test object class, but are not supported by AppletCS. There are no such methods currently defined.
In Planning Support for the AllLights Control, you decided to support new test object methods on AllLights test objects. You now need to add these methods to the list of additional test object methods required for the test object class. After you finish generating the support files using the wizard, you implement support for the methods you add.
The test object methods are added to the existing test object class. This means that the new methods appear in OpenText Functional Testing for all test objects of this class, regardless of whether or not they are supported for these objects. In a GUI test, if you call a test object method for an object, and that method is not supported, a run-time error occurs. This is the reason you are creating the new AllLights test object class.
Click Add in the Additional test object methods required for test object class pane. The Test Object Method dialog box opens.
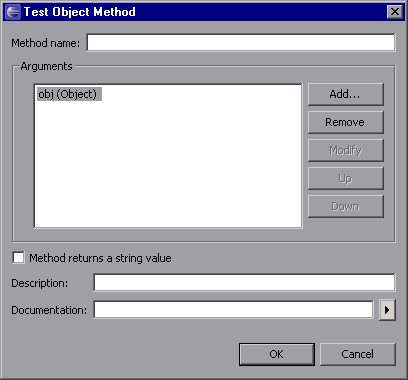
In the Method Name box, enter: Restart. The Restart test object method does not require any arguments other than the mandatory obj (Object) that represents the custom control.
Leave the Method returns a string value check box cleared. This method returns only a return code.
In the Description box, enter: Clicks the RESTART button.
In the Documentation box, enter: Click the RESTART button.
Click OK to close the Test Object Method dialog box and add the Restart method to the list.
Add another test object method by clicking Add once again. In the Test Object Method dialog box that opens, perform the following:
In the Method Name box, enter: ClickLight.
Add the Row and Column arguments to the ClickLight method:
In the Arguments area, click Add. The Test Object Method Argument dialog box opens.
In the Name box, enter: Row.
In the Type box, select Variant. (If you select String, then when you add steps in GUI tests with the ClickLight method, you have to enclose the row number argument in quotes.)
Leave the Mandatory argument check box selected.
Click OK to close the Test Object Method Argument dialog box and add the Row argument to the list of arguments for the ClickLight test object method.
Repeat this procedure to add the Column argument to the list.
Leave the Method returns a string value check box cleared.
In the Description box, enter: Clicks the specified light.
In the Documentation box, enter: Click the light in row <Row> column <Column>. Enter the <Row> and <Column> arguments in the sentence by clicking
 and selecting the relevant argument. The final text in the Documentation box will be: Click the light in row %a1 column %a2.
Click OK to close the Test Object Method dialog box and add the ClickLight method to the list.
Click Next. The Custom Control Recording Support wizard screen opens.
Determine the set of events for which to listen, to support recording on the AllLights control.
This screen displays the event listeners supported by the support class you selected to extend. It enables you to select listeners whose implementation you want to override with new functionality and to add new event listeners to implement:
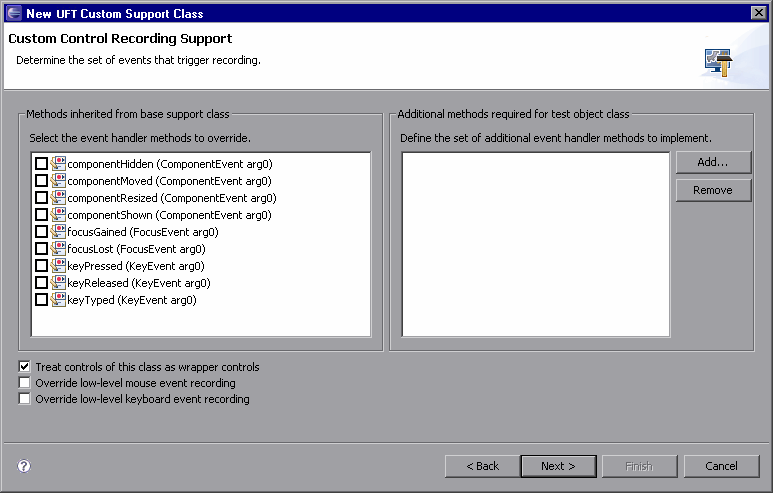
In the left pane, you can see the listeners implemented by AppletCS. You do not have to override any of these for the AllLightsCS custom support class.
In the right pane, you specify the listeners you want to add for AllLightsCS. Each listener you select implies a set of event handler methods you add to the custom support class.
Click Add to add the MouseListener.
The Listener dialog box opens:
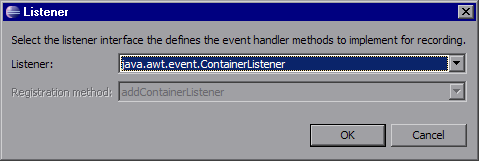
Select java.awt.event.MouseListener from the Listener list and click OK. The Listener dialog box closes and the MouseListener, and all of the event handler methods it includes, are added to the list in the right pane of the wizard screen.
On the Custom Control Recording Support screen:
Clear the Treat controls of this class as wrapper controls check box. It is selected, by default, because the AllLights class extends java.awt.container.
Select the Override low-level mouse event recording check box to prevent low-level events (coordinate-based operations) from being recorded instead of the events you want to record.
Click Next. The New Test Object Class Details screen opens.
Define the details for the new test object class AllLights.
In this screen you define the details of the new test object class you are creating to map to the custom control.
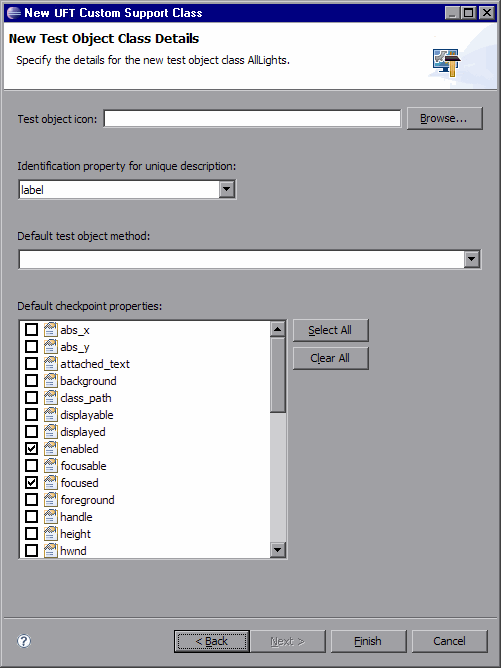
Perform the following:
For the Test object icon, click Browse, locate the <Java_Add-in_Extensibility_SDK_installdir>\samples\Javaboutique folder, and select the AllLights_icon.ico file.
In the Identification property for unique description box, leave the selected label property.
Note: If you wanted to include additional identification properties in the test object description, you would have to manually specify this in the test object configuration file. For more information, see New Test Object Class Details Screen.
In the Default test object method list, select ClickLight.
In the Default checkpoint properties box, leave the selected properties and select also the GameOver, OnCount, and OnList check boxes.
Click Finish. The Custom Control Support Class Summary screen opens.
View the custom control support class summary.
Review the planned content of the custom support class, and click OK.
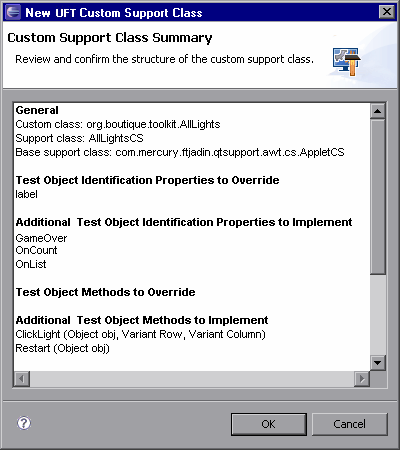
The following changes are made in the JavaboutiqueSupport project:
A new custom support class, AllLightsCS, is created in the com.mercury.ftjadin.qtsupport.Javaboutique.cs package. The file is opened and displayed in a tab in the right pane.
A new JavaboutiqueTestObjects.xml file is created in the Configuration\TestObjects folder.
The Javaboutique.xml file is modified. An element is added to the file, mapping the AllLights custom class to the AllLightCS support class. For information on the structure of this file, see the Toolkit Configuration Schema Help.
For a detailed explanation of the AllLightsCS class and the JavaboutiqueTestObjects.xml file, see Understanding the New Custom Support Files.
The asterisk (*) next to the AllLightsCS file name (in the AllLightsCS tab) indicates that it has not been saved. The changes made by the wizard are codependent, and must be saved to prevent discrepancies. Select File > Save, or click the Save button.
Understanding the New Custom Support Files
When you completed the process of the New UFT Custom Support Class, the wizard registered the new class in the toolkit configuration file, and created the following files:
AllLightsCS.java. This file contains the new AllLightsCS support class.
JavaboutiqueTestObject.xml. This file contains the new test object classes defined for the Javaboutique toolkit support. At this point, there is only one such test object class: AllLights.
The following sections explain the content created in the AllLightsCS and JavaboutiqueTestObject files.
Understanding the AllLightsCS Custom Support Class
After having performed the lesson Learning to Support a Simple Control, you are familiar with the basic elements that the wizard creates in a new custom support class. Examine the contents of the new AllLightsCS.java file, and locate the following methods and declarations:
The declaration of the AllLightsCS support class, which indicates that it extends the AppletCS support class and implements the MouseListener interface.
The declaration of the DEBUG_ALLLIGHTSCS flag, which can be used to control printing log messages.
The AllLightsCS constructor method, which calls addSimpleListener to add MouseListener to the list of listeners that need to be registered on the AllLights control.
The to_class_attr method, which returns the new test object class name: AllLights.
A method stub for label_attr returning super.label_attr, which you can replace with a more specific label.
Method stubs for the oncount_attr, onlist_attr, and gameover_attr methods, which you must implement to support the identification properties you added. Until you do so, these methods return null, because these are new methods that you added and they are not implemented in the superclasses that AllLightsCS extends.
Note: You can use uppercase letters in the identification property names that you provide in the wizard screen. These names are written as is in the test object configuration file. However, in the names of the support methods for these identification properties, the wizard replaces uppercase letters with lowercase ones. In OpenText Functional Testing, the identification property names are displayed in lowercase letters only.
Method stubs for the Restart_replayMethod and ClickLight_replayMethod methods, which you must implement to support the test object methods you added. Until you do so, these methods return the error code NOT_IMPLEMENTED.
The mouseRecordTarget method, which returns null to override recording of low-level mouse events.
Method stubs for the event handler methods defined by the MouseListener interface: mouseClicked, mouseEntered, mouseExited, mousePressed, and mouseReleased. These method stubs contain comments reminding you to implement them as necessary, calling MicAPI.record to send record messages to OpenText Functional Testing.
The isWindow method, returning true, was added to the AllLightsCS support class because you selected the Controls of this class represent top-level objects check box, on the Custom Class Selection screen. When learning the test object, OpenText Functional Testing calls the isWindow method to determine whether to look for a parent object or view this object as the highest Java object in the hierarchy.
Understanding the Javaboutique Test Object Configuration File
The wizard builds the test object class definition in the test object configuration file based on the details you specify.
Open the new JavaboutiqueTestObject.xml file and examine its contents. For information on the structure of this file, see the Test Object Schema Help.
Locate the following elements in the test object configuration file:
The names of the custom toolkit and the add-in to which the test object classes in this file belong (in the TypeInformation element):
The test object class that the new test object class extends (in the ClassInfo element):
The name of the new test object class and its default test object method (in the ClassInfo element):
The location of the icon file (in the IconInfo element):
The definition of the new test object methods you added, and their description, documentation, and arguments (in the <TypeInfo> element).
The definition of the identification properties for this test object class (in the <IdentificationProperties> element). Note the identification properties marked ForVerification, ForDefaultVerification, and ForDescription.
PackageName="Javaboutique" AddinName="Java"
BaseClassInfoName="JavaApplet"DefaultOperationName="ClickLight" Name="AllLights"
IconFile="<Java_Add-in_Extensibility_SDK_installdir>\samples\Javaboutique\AllLights_icon.ico"
 Next steps:


