
Share this page


Board view
The board view provides a visual, interactive display of work items split into columns.
Overview
Each column in the board represents a phase, allowing you to drag items from one phase to another.
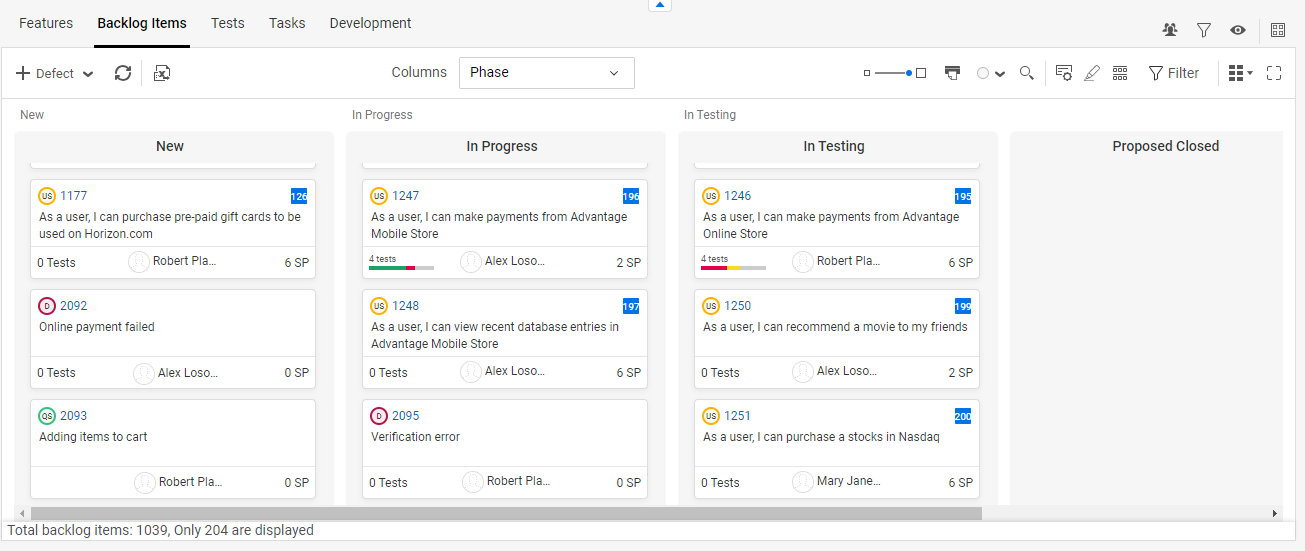
The example below shows a board view with backlog items in the New, In Progress, and In Testing phases.
The board view is available for the following entities: Epics, features, backlog items, tasks, and requirement children.
In most board views, the columns are arranged by phases. Some boards allow you to arrange the columns by other fields, such as Release or Team, allowing you to use the board for planning. The following table describes which fields can be selected in the different board views.
| Board view | Available fields for columns |
|---|---|
| Epics | Phase field only |
| Features |
Any single-selection list or reference field |
| Backlog > Backlog Items |
Any single-selection list or reference field Note: The Phase field is not available in this view. |
| Team Backlog > Backlog Items | Phase or Metaphase field |
| Tasks | Phase field only |
| Requirements > Children | Phase field only |
Work in board view
This section describes basic board view instructions.
To work in a board view:
-
Open one of the following tabs: Epics, Features, Backlog Items, Tasks, Requirements > Children.
-
From the view types list, select the Board View option
 .
. -
In boards where column selection is available:
-
Select a field from the Columns list.
-
Click the Choose Columns button
 and select the field values that you want to display in the board.
-
-
Perform any of the below actions in the board view.
Action Details Move cards Drag and drop a card from one column to another. The item is assigned the field value represented by the target column.
Dragging from one phase column to another depends on the possible transitions defined for the entity. For details, see Workflow.
Change a card's rank
Drag and drop a card vertically to change a card's rank within its phase.
Add items Click the More button
 next to + <Add item> and select the type of item to add.
Change card size Move the Card size slider
 to change the card size. In the smaller card sizes, less details are displayed on the cards.
Print cards Click the Print cards button
 to open the cards in a preview and print them. The filter you apply to the board view also applies to the print output.
Set board background color
In the Background color list
 , select a color for the board's background. This color only applies to the online view, not to the printout.
Choose from a list of fields to display in the cards. Some fields, such as Rank and Dependencies, are displayed as indicators.
You can change the predefined fields to include other fields that are available for the given entity.
Click the Cards customization button
 and select the fields you want to include.
Note: If the cards are viewed in small size, some fields are not represented on cards. Choose the medium or large card size to display more fields on the cards.
Refine items in view Perform standard actions on the items in the view, such as filter, group, and apply colors. For details, see Grids and boards and Filters.
Additional options are available in planning boards and in the team backlog board. For details, see Planning board and Team backlog board.
Planning board
The Features and Backlog > Backlog Items board views allow you to arrange the columns by other fields besides Phase. For example, if you select the Milestone field, the columns will be arranged by milestones, not phases.
Selecting other fields is useful for planning. For example, product managers can configure the board by milestone, priority, or release, and drag-and-drop items into the appropriate columns.
In the supporting board views, you can choose the field values that are displayed in the board. For example, for the Priority field, you can select to display only the High, Very High, and Urgent columns.
To select a field and field values:
-
Select the Features or Backlog > Backlog Items tab.
-
In the View Type list, select the Board View option
. -
Select a field from the Columns list.
-
Click the Choose Columns button
and select the field values that you want to display in the board.
Use case: Plan a release scope
You can use the board to assign features or backlog items to releases.
-
In the Columns list, select Release. The board displays all releases defined in the workspace.
-
To display specific releases in the board, click the Choose Columns button
and select the releases you want to plan.Note: Besides the releases you selected, an additional first column is displayed: No release. This column is added to allow you to drag non-assigned items to a release column.
-
To assign items to a release, drag items from the No release column to a release column.
To unassign items from a release, drag items from a release column to the No release column.
-
To add new backlog items directly to the board:
-
Hover over the column to which you want to add an item.
-
Click the Add button
 . In the Backlog Items board, select which item type you want to create: User story, quality story, or defect.
Fill in the item details.
-
Tip: To assign items, not only to a release, but also to a team, group the items by team. For details, see Grids and boards. You can then drag items between columns, and to a team within the same column.
Team backlog board
The team backlog board allows you to perform special column customizations and to set work-in-progress limits. For details, see Team backlog board.


